Recent Posts

How to Improve Gas Mileage on Toyota Sienna


Sure, here is your requested article: How to Improve Gas Mileage on Toyota Sienna

In today’s world of rising fuel costs and environmental awareness, improving gas mileage is a top priority for many Toyota Sienna owners. Fortunately, there are several practical steps you can take to optimize the fuel efficiency of your Sienna without compromising its performance. By implementing these tips, you can enjoy significant savings at the gas pump while reducing your carbon footprint.

1. Maintain Proper Tire Pressure

One of the simplest yet most effective ways to improve gas mileage on your Toyota Sienna is by ensuring that your tires are properly inflated. Under-inflated tires can increase rolling resistance, which in turn reduces fuel efficiency. By regularly checking and maintaining the recommended tire pressure, you can optimize your Sienna’s gas mileage and extend the life of your tires.

2. Drive Smoothly and Efficiently

Aggressive driving behaviors such as rapid acceleration, sudden braking, and excessive speeding can significantly decrease your Sienna’s fuel economy. By driving smoothly and efficiently, you can conserve fuel and improve gas mileage. Gradually accelerating, maintaining a steady speed, and anticipating stops can all contribute to better fuel efficiency.


3. Keep Your Sienna Well-Maintained

Regular maintenance is crucial for ensuring optimal gas mileage. Keeping your Toyota Sienna well-maintained includes timely oil changes, air filter replacements, and spark plug inspections. Additionally, using the recommended grade of motor oil can further enhance fuel efficiency. Properly maintained engines operate more efficiently, leading to improved gas mileage.

4. Lighten the Load

Carrying unnecessary weight in your Sienna can increase fuel consumption. Periodically remove any unnecessary items from your vehicle, including heavy cargo and roof racks, to lighten the load and improve gas mileage. Traveling lighter can make a noticeable difference in your Sienna’s fuel efficiency, especially for longer trips.

5. Use the Correct Octane Fuel

Using the manufacturer-recommended octane fuel for your Toyota Sienna can optimize engine performance, leading to improved gas mileage. While it may be tempting to use a lower-octane fuel to save money, doing so can compromise the engine’s efficiency and fuel economy. Always adhere to the recommended fuel type for your Sienna.

How to Improve Gas Mileage on Toyota Sienna

Credit: www.youtube.com

6. Utilize the Vehicle’s Eco-Mode

Many modern Sienna models come equipped with an eco-mode feature designed to enhance fuel efficiency. Activating the eco-mode optimizes the vehicle’s performance to conserve fuel, making it a valuable tool for improving gas mileage. Take advantage of this feature when driving in situations that allow for lower power demands, such as highway cruising.

7. Plan and Combine Trips

Consolidating multiple errands into one trip and using a GPS to plan the most efficient routes can minimize unnecessary fuel consumption. By reducing the number of cold starts and optimizing travel paths, you can improve gas mileage and reduce overall driving time. Smart trip planning is a practical strategy for Sienna owners seeking to maximize fuel efficiency.

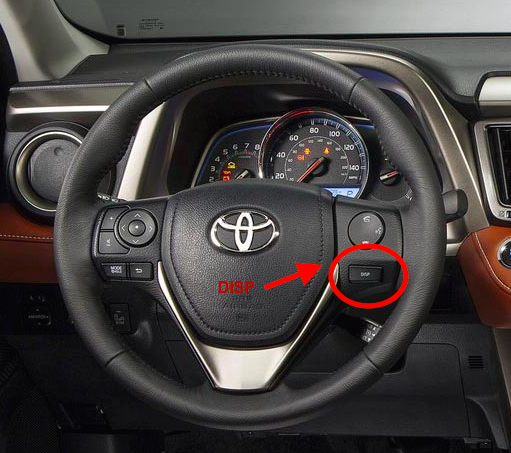
8. Monitor Your Driving Habits

Utilizing modern technology such as fuel economy tracking apps or the vehicle’s onboard fuel consumption display can help you monitor and adjust your driving habits for better fuel efficiency. By being mindful of your driving patterns and making adjustments as necessary, you can actively improve your Sienna’s gas mileage on an ongoing basis.

How to Improve Gas Mileage on Toyota Sienna

Credit: wtop.com

Frequently Asked Questions Of How To Improve Gas Mileage On Toyota Sienna

How Can I Improve Gas Mileage On My Toyota Sienna?

To improve gas mileage on your Toyota Sienna, make sure to keep your tires properly inflated, avoid excessive idling, and maintain a consistent speed while driving. Regularly servicing your vehicle and using the recommended motor oil can also help optimize fuel efficiency.

What Are Some Driving Habits That Can Improve Gas Mileage?

Adopting efficient driving habits such as accelerating and braking smoothly, avoiding aggressive maneuvers, and using cruise control on the highways can significantly improve gas mileage. Additionally, planning your trips to minimize stop-and-go driving and removing excess weight from your vehicle can further enhance fuel efficiency.

Does The Use Of Air Conditioning Affect Gas Mileage?

Yes, using air conditioning in your Toyota Sienna can impact gas mileage. Running the AC puts an extra load on the engine, leading to increased fuel consumption. To improve gas mileage, consider using the AC sparingly and utilize other ventilation options such as open windows or switching to the vehicle’s recirculation mode when possible.

Conclusion

Improving gas mileage on your Toyota Sienna is not only beneficial for your wallet, but also for the environment. By following these practical tips and adopting fuel-efficient driving habits, you can enjoy significant savings on fuel costs while reducing your carbon footprint. Whether it’s maintaining proper tire pressure, driving smoothly, or keeping your Sienna well-maintained, every effort you make to optimize fuel efficiency contributes to a greener and more economical driving experience.

Can Hyundai Dealers Work on Genesis


Yes, Hyundai dealerships can work on Genesis vehicles,

but there are nuances in technician training and service capabilities.

It's essential to understand these subtleties to ensure your Genesis receives the appropriate level of care.

Understanding Genesis Service Policies

understanding genesis service details

To fully grasp Genesis service policies, it's important to know that not all Hyundai dealerships are authorized to perform maintenance on Genesis vehicles. This distinction underscores the Genesis exclusivity and luxury branding that sets these cars apart from Hyundai's broader lineup. As a luxury car owner, you're not just paying for premium features and performance but also for a specialized service experience. This exclusivity means that when you need maintenance or repairs, you can't just take your Genesis to any Hyundai dealership.

Genesis has cultivated a unique identity within the automotive world, emphasizing not only advanced technology and superior comfort but an exclusive service experience. This approach is integral to maintaining the brand's luxury status. Accordingly, authorized dealerships are equipped with the knowledge, tools, and parts specifically designed for Genesis vehicles. This guarantees that your car receives the best possible care, maintaining its high standards and performance.

Comprehending these service policies highlights the brand's commitment to offering a distinct, luxury experience. It's a reminder that Genesis seeks to provide not only a superior product but an exclusive ownership journey, setting itself apart from the broader market, including its Hyundai counterparts.

Hyundai Dealership Capabilities

While not all Hyundai dealerships can service Genesis vehicles, those that are authorized possess the necessary expertise and equipment to provide top-tier maintenance and repairs. This guarantees your Genesis receives the care it deserves, keeping it running smoothly and efficiently. When you bring your Genesis to an authorized Hyundai dealer, you're tapping into a network of services designed to meet the specific needs of your vehicle.

At these dealerships, you'll find:

  • A wide dealer inventory: If you need parts, these dealerships have access to a broad inventory of genuine Genesis parts. This means less waiting time for repairs and the assurance that your vehicle retains its original performance and safety standards.
  • Advanced diagnostic equipment: Authorized dealers have the latest tools and technologies to accurately diagnose and fix any issues with your Genesis. This ensures that your vehicle is serviced correctly the primary time, saving you time and money.
  • Exclusive customer amenities: Many Hyundai dealerships offer amenities such as comfortable waiting areas, loaner vehicles, and shuttle services, making your service experience as convenient and pleasant as possible.

Technician Training and Expertise

technician skills and training

Beyond the high-tech equipment and genuine parts availability at authorized Hyundai dealers, the expertise of technicians plays a pivotal role in ensuring your Genesis vehicle receives superior care and maintenance. It's not just about having the correct tools; it's about the hands that wield them. Hyundai technicians undergo rigorous training to meet the high standards set for Genesis vehicles. This training ensures that they're not just familiar with the specialized tools required but are adept at using them efficiently and effectively.

Aspect Importance Outcome
Specialized Tools Crucial for precise diagnostics and repair. Improved vehicle performance and longevity.
Certification Validates the technician's expertise. Trust in the quality of service provided.
Continuous Training Keeps technicians updated on the latest models. Ensures your Genesis receives high-quality care.

Certification requirements are stringent, requiring technicians to demonstrate proficiency in handling the unique aspects of Genesis vehicles. This isn't just about passing a test; it's about continuous improvement and staying ahead of automotive innovations. As a Genesis owner, you can rest assured that the person under the hood has been trained to treat your vehicle with the care it deserves.

Service Options for Genesis Owners

Genesis owners have several service options available to make sure their vehicle receives top care and maintenance. To guarantee your Genesis stays in peak condition, it's critical to understand the array of services at your disposal.

  • Genesis Concierge: This premium service provides a personalized experience. You'll have access to a dedicated concierge who can assist with different needs, including appointment scheduling. This bespoke service aims to make your life easier, guaranteeing your Genesis receives the care it deserves without disrupting your busy schedule.
  • Authorized Service Centers: For routine maintenance or more complex repairs, authorized Genesis service centers are equipped with the latest tools and technology. Technicians are specifically trained to work on Genesis vehicles, offering a level of expertise that's hard to match.
  • Online Appointment Scheduling: Genesis makes it convenient for you to manage your vehicle's service needs. Through their online platform, you can easily schedule appointments at a time that works for you. This feature streamlines the process, reducing the time you spend on maintenance planning.

These service options, combined with the expertise of trained technicians, make sure your Genesis remains in top condition, providing a seamless ownership experience.

Warranty and Service Implications

warranty and service considerations

Understanding your Genesis vehicle's warranty and service implications is vital, as it directly impacts your car's maintenance and overall performance. When considering Hyundai dealers for Genesis service, it's important to know how this choice may affect your warranty. Usually, factory warranties remain intact when services are performed by authorized dealerships, ensuring that any necessary repairs, including recall procedures, are covered.

However, the scenario shifts when considering aftermarket modifications. Installing non-OEM (Original Equipment Manufacturer) parts or unauthorized modifications can void your warranty, leaving you financially responsible for any related repairs or damages. It's imperative to weigh the benefits of customization against the potential risks to your warranty coverage.

Moreover, comprehending the specifics of your warranty can save you from unexpected costs. Recall procedures, for instance, are typically covered by the manufacturer, but ensuring the service is done at an authorized location is key to maintaining coverage. Always verify with your service provider that the work performed aligns with your warranty's terms to avoid voiding it inadvertently.

Conclusion

In summary, while Hyundai dealerships might've the baseline capability to service Genesis vehicles, it's important you check their technician training and expertise specific to Genesis models. Opting for services at these dealerships can offer convenience, but make sure it aligns with warranty and service policies to avoid complications.

Ultimately, for specialized care, seeking out certified Genesis service centers is advisable to maintain your vehicle's performance and value, ensuring your Genesis receives the meticulous attention it deserves.

How to Reset the Maintenance Light on a 2015 Toyota Rav4


To reset the maintenance light on a 2015 Toyota Rav4, turn the ignition off and press the trip meter button. Then, turn the ignition on without starting the engine and continue holding the button until the light resets.

If you want to reset the maintenance light on your 2015 Toyota Rav4, you can easily do so by following these simple steps. Taking care of your vehicle’s maintenance is crucial to ensure its longevity and optimal performance. One of the routine tasks is resetting the maintenance light after completing a service.

Thankfully, the process for the 2015 Toyota Rav4 is straightforward and can be done without the need for a trip to the dealership or a mechanic. This article will guide you through the steps to reset the maintenance light on a 2015 Toyota Rav4.

How to Reset the Maintenance Light on a 2015 Toyota Rav4

Credit: oilreset.com

Understanding The Maintenance Light

In order to properly maintain your 2015 Toyota Rav4, it’s important to understand the maintenance light and how to reset it when needed. The maintenance light serves as a helpful reminder for vehicle upkeep and can alert you when certain services are required. By familiarizing yourself with the purpose of the maintenance light and recognizing the signs that maintenance is needed, you can stay on top of essential vehicle care and keep your Rav4 in optimal condition.

Purpose Of The Maintenance Light

The maintenance light on your 2015 Toyota Rav4 is designed to prompt you when regular service is due for various components of the vehicle. It serves as a visual reminder for scheduled maintenance tasks, such as oil changes, tire rotations, and other routine check-ups. By staying attentive to the maintenance light, you can ensure that your Rav4 receives the necessary attention to maintain its performance and longevity over time.

Signs That Maintenance Is Required

When the maintenance light illuminates on your dashboard, it’s essential to promptly address the impending service needs. Recognize signs such as, change in engine performance, unusual noises, or dashboard warning lights, as these may indicate a need for immediate attention. Ignoring these signs can lead to more serious issues down the road and affect your Rav4’s reliability and safety. By addressing maintenance needs as soon as they arise, you can prevent potential problems and keep your vehicle running smoothly.

How to Reset the Maintenance Light on a 2015 Toyota Rav4

Credit: oilreset.com

Methods To Reset Maintenance Light

Resetting the maintenance light on a 2015 Toyota Rav4 is a straightforward process that can be easily done at home. There are a couple of methods to reset the maintenance light, each offering a simple and effective way to clear the indicator.

Method 1: Using The Trip Meter Button

1. Turn the ignition switch to the “on” position without starting the engine.

2. Locate the trip meter reset button and push and hold it until the trip meter displays “000000.”

3. Turn the ignition switch off and then start the engine to verify that the maintenance light has been reset.

Method 2: Using Odometer And Engine Start Button

1. Insert the key into the ignition and turn it to the “on” position without starting the engine.

2. Press and hold the odometer button while pressing the engine start button twice. Release both buttons.

3. The maintenance light should flash and then turn off to indicate a successful reset.

Tips For Maintenance Reminder

In ensuring the optimal performance of your 2015 Toyota RAV4, it is essential to reset the maintenance light promptly. To assist with this, here are some valuable tips for managing maintenance reminders effectively.

Setting Personalized Maintenance Reminders

To personalize maintenance reminders, navigate through the dashboard settings on your Toyota RAV4 console.

  • Access dashboard settings
  • Locate maintenance reminder option
  • Set personalized maintenance intervals

Consulting The Owner’s Manual For Maintenance Schedule

Refer to the owner’s manual provided with your Toyota RAV4 for detailed maintenance schedules.

  1. Check maintenance requirements
  2. Adhere to specified schedules
  3. Note down upcoming maintenance tasks
How to Reset the Maintenance Light on a 2015 Toyota Rav4

Credit: www.youtube.com

Frequently Asked Questions On How To Reset The Maintenance Light On A 2015 Toyota Rav4

How Often Should I Reset The Maintenance Light On My 2015 Toyota Rav4?

Resetting the maintenance light is necessary after completing scheduled maintenance or repairs on your Rav4.

What Are The Steps To Reset The Maintenance Light On A 2015 Toyota Rav4?

To reset the maintenance light, simply locate the trip button on the dashboard and press and hold it until the light turns off.

Will Resetting The Maintenance Light On My Rav4 Erase Any Important Data?

No, resetting the maintenance light will not erase any important data or affect the performance of your vehicle.

Conclusion

After following these simple steps, you can easily reset the maintenance light on your 2015 Toyota Rav4. By staying on top of your vehicle’s maintenance, you ensure its longevity and performance. Remember, regular maintenance is key to a well-functioning car.

Stay informed and drive with confidence.


What Is the Function of the Distributor


The distributor is a key component of the ignition system in a vehicle. It serves the critical function of directing electrical current from the ignition coil to the spark plugs. This process must occur in the correct order and at the precise moment to ensure optimal engine performance.

The distributor achieves this by rotating at a synchronized speed with the engine. As it spins, it distributes high-voltage power to each spark plug in the firing order. This coordinated timing is essential for igniting the air-fuel mixture in each cylinder, ultimately powering the vehicle.

Distributor Basics

understanding distributor roles and responsibilities

At its core, a distributor is a critical component in an ignition system, ensuring the timely and precise distribution of electrical energy to the spark plugs. You'll find it's composed of several key distributor components, each playing a pivotal role in the system's overall function. The rotor, cap, and points, alongside the vacuum and mechanical advance mechanisms, work in unison to direct high-voltage electricity from the ignition coil to the correct spark plug at the right moment.

The historical evolution of the distributor reveals a tale of technological advancement and refinement. Initially, the systems were mechanically simple but limited in precision and reliability. Over time, the introduction of electronic ignition systems dramatically enhanced the accuracy with which the distributor could time the delivery of electrical energy, greatly improving engine efficiency and performance. This evolution reflects not just changes in the distributor itself but also the broader shift towards more electronically controlled and efficient automotive systems.

Comprehending the distributor's components and their historical evolution gives you a solid foundation in grasping how critical this part is within the ignition system. It's a reflection of how automotive technology has advanced, ensuring your vehicle runs smoothly and efficiently.

Timing the Ignition

Comprehending the precise timing of ignition is pivotal, as it determines when the spark plugs ignite the fuel-air mixture in the engine's combustion chambers. This process isn't just about creating a spark; it's about doing so at exactly the right moment for maximum efficiency and power. The role of the distributor in this context is vital, as it's responsible for making sure spark plug synchronization. This means each spark plug fires at the best point in the engine's cycle, contributing to combustion optimization.

Achieving this synchronization requires a fine-tuned mechanism that can adjust the timing based on engine speed and load. As engine conditions change, the timing of the ignition must be adapted to maintain top performance. This adaptation prevents pre-ignition or knocking, which can lead to engine damage. The distributor's ability to adjust the timing ensures that the spark plugs fire with precision, maximizing the engine's power output and fuel efficiency.

Essentially, the distributor acts as the orchestra conductor for the engine's symphony, making sure each spark plug fires in harmony with the others. This orchestration is key to achieving seamless combustion optimization, directly impacting the vehicle's performance and longevity.

Directing Electrical Current

controlling electric flow accurately

While orchestrating the ignition process, the distributor plays a crucial role in directing electrical current to the spark plugs. This component acts as a channel, making sure that current flow is precisely managed to promote best engine performance. The distributor's design allows it to receive high-voltage electrical current from the ignition coil and distribute it to each spark plug in the correct sequence. This distribution process is critical for the synchronized firing of spark plugs, which in turn ignites the air-fuel mixture within the engine's cylinders.

The mechanism by which the distributor directs current involves both mechanical and electrical principles. At its core, the distributor houses a rotating arm, known as the rotor, which passes close to a series of contacts connected to the spark plugs through high-tension leads. As the rotor spins, it sequentially aligns with these contacts, facilitating a controlled electrical breakdown across the gap. This breakdown allows the high-voltage current to jump from the rotor to the respective contact, thus directing the current flow to the spark plug.

This precise control over current flow and timing is crucial to avoid misfires and ensure efficient combustion. The distributor's ability to direct the electrical current accurately is foundational to maintaining the engine's rhythm and ensuring that power delivery is smooth and consistent.

Impact on Engine Performance

How does the distributor's efficiency in managing electrical currents influence engine performance?

The distributor plays a pivotal role in your vehicle's engine, acting as a gatekeeper for electrical currents that ignite the fuel-air mixture within the combustion chambers. This ignition is critical for engine startup and its subsequent operation. When the distributor functions at its best, it guarantees that the spark timing is precise. This precision directly affects fuel efficiency as well-timed sparks mean the fuel combusts at the ideal moment for maximum energy conversion.

Furthermore, the distributor's role extends to emission control. By making certain that the fuel burns completely, it reduces the emission of unburnt hydrocarbons, a common pollutant emitted from vehicles. Incomplete combustion not only wastes fuel but increases emissions, contributing to environmental pollution and violating emission standards.

Hence, the efficiency of the distributor isn't just about facilitating a smooth ride. It's about optimizing fuel consumption and minimizing the vehicle's environmental footprint. An efficiently functioning distributor guarantees that each spark occurs at the precise moment, leading to better fuel efficiency and stricter emission control. This interplay between precise electrical current management and engine performance underscores the distributor's critical role in modern automotive systems.

Maintenance and Troubleshooting

technical support and repairs

To guarantee your distributor maintains peak performance, regular maintenance and timely troubleshooting are essential. You've got to understand the specifics of cleaning techniques and be vigilant about replacement intervals to avoid performance dips or engine misfires.

Here's a concise guide to keep you on track:

Maintenance Task Recommended Action
Visual Inspection Regularly check for wear and tear or any signs of corrosion.
Cleaning Employ specialized cleaning techniques to prevent dirt and debris buildup.
Cap and Rotor Check Inspect for cracks or carbon tracks and clean contacts.
Timing Adjustment Periodically verify and adjust the ignition timing.
Replacement Follow manufacturer's guidelines on replacement intervals for the distributor and its components.

Conclusion

In summary, you've learned that the distributor plays a vital role in your vehicle's ignition system. By precisely timing the ignition and efficiently directing electrical current, it greatly impacts engine performance.

Regular maintenance and adept troubleshooting are necessary to guarantee its prime function. Understanding its mechanics and keeping it in top condition not only improves your vehicle's efficiency but also prevents potential engine issues, highlighting the distributor's pivotal role in automotive engineering.

How to Reset Brake Override Malfunction Toyota


Have you encountered a brake override malfunction in your Toyota vehicle? This issue can be concerning and potentially dangerous, but the good news is that there are steps you can take to reset the brake override system and ensure the safety and functionality of your vehicle.

In this comprehensive guide, we’ll walk you through the process of resetting the brake override malfunction in your Toyota.


How to Reset Brake Override Malfunction Toyota

Credit: m.youtube.com

Understanding Brake Override Malfunction

Before we delve into the steps for resetting the brake override malfunction, it’s essential to understand what this issue entails.

Brake override malfunction occurs when the vehicle’s electronic control system perceives a conflict between the accelerator and brake pedals, potentially causing the brakes to be applied involuntarily.

This can lead to a loss of control and compromise the safety of the vehicle and its occupants.

Credit: www.tacomaworld.com

Steps to Reset Brake Override Malfunction

Resetting the brake override malfunction in a Toyota involves a systematic approach to recalibrating the vehicle’s electronic control system. Follow these step-by-step instructions to address the issue and restore the proper functionality of your brakes:

  1. Start by ensuring the vehicle is parked in a safe and level location, with the engine turned off.
  2. Locate the vehicle’s OBD-II port, typically found beneath the dashboard on the driver’s side.
  3. Use an OBD-II scanner to connect to the vehicle’s onboard computer system.
  4. Once connected, access the scanner’s menu and select the option to clear diagnostic trouble codes (DTCs).
  5. Follow the on-screen prompts to clear the DTCs associated with the brake override malfunction.
  6. After clearing the codes, disconnect the OBD-II scanner from the vehicle.
  7. With the scanner disconnected, start the vehicle and allow it to idle for a few minutes to ensure the reset is successful.
  8. Test the brakes by gently applying pressure to the pedal while the vehicle is stationary, then gradually increasing speed and applying the brakes as needed.
  9. Monitor the vehicle’s performance and ensure that the brake override malfunction has been resolved.

Consulting a Professional

If you encounter any challenges or are unsure about resetting the brake override malfunction on your Toyota, it’s highly advisable to seek the expertise of a qualified automotive technician or contact your nearest Toyota service center.

Professional technicians have the knowledge and specialized tools to diagnose and address complex electronic control system issues, ensuring the safety and reliability of your vehicle.

Preventing Brake Override Malfunction

While knowing how to reset the brake override malfunction is crucial, proactive maintenance and awareness can help prevent such issues from occurring.

Regularly servicing your vehicle, including brake system inspections and electronic diagnostics, can identify and address potential concerns before they escalate into more significant problems.

Additionally, staying informed about any recalls or technical service bulletins related to your vehicle model can provide insight into known issues and their solutions.

Frequently Asked Questions For How To Reset Brake Override Malfunction Toyota

How To Reset Brake Override Malfunction In Toyota Vehicles?

To reset the brake override malfunction in Toyota vehicles, follow these steps:
1. Turn off the engine and locate the brake pedal.

2. Depress the brake pedal and hold it firmly for at least 15 seconds.

3. While still holding the brake pedal, start the engine.

4. Continue holding the brake pedal for another 10 seconds or until the brake override malfunction warning light turns off.

5. Release the brake pedal and ensure that the warning light has reset.

Why Is My Toyota Showing A Brake Override Malfunction?

Toyota vehicles may display a brake override malfunction warning due to various reasons, such as a faulty sensor, electrical issues, or a problem with the brake system. It’s important to address this issue promptly to ensure the safety and proper functioning of your vehicle.

Can I Drive My Toyota With A Brake Override Malfunction?

It is not recommended to drive your Toyota vehicle with a brake override malfunction. This warning indicates a potential issue with the braking system, which could compromise your safety on the road. It is advisable to have the problem diagnosed and repaired by a qualified technician before driving the vehicle.

Conclusion

Brake override malfunction in a Toyota can disrupt the normal operation of your vehicle and compromise safety. By understanding the steps to reset this malfunction and staying proactive in vehicle maintenance, you can ensure the proper functionality of your brakes and the overall safety of your Toyota.

Remember, safety should always be the top priority when addressing vehicle malfunctions, and seeking professional assistance when in doubt is a wise decision.


Why Is My Distributor Not Getting Spark


  • A faulty ignition coil
  • Worn distributor caps
  • Damaged rotor buttons
  • A faulty ignition module
  • Poor electrical connections

These issues can all cause your distributor to not get spark.

Faulty Ignition Coil

potential car ignition problem

A faulty ignition coil can disrupt your vehicle's spark distribution, leading to engine performance issues. This critical component's primary function is to convert the battery's low voltage to the thousands of volts needed to create an electric spark in the spark plugs, igniting the fuel. When it's not working correctly, you'll likely experience misfires, a rough idle, or your car mightn't start at all.

Coil corrosion is a common culprit behind ignition coil failures. It's vital to inspect the coil for any signs of rust or corrosion, which can impede electrical conductivity. If you detect corrosion, it's time to replace the coil to restore proper functionality. Furthermore, make sure that the replacement coil is compatible with your vehicle's spark plugs. Mismatched components can lead to inefficient combustion and further engine troubles.

To maintain peak performance, regularly check the ignition coil for signs of wear or damage. Keeping an eye on coil corrosion and ensuring spark plug compatibility can save you from unexpected breakdowns and costly repairs. Remember, a well-maintained ignition system is key to a smoothly running engine.

Worn Distributor Cap

Having addressed ignition coil issues, another component that often causes spark distribution problems is the distributor cap, which can wear out over time. The distributor cap plays a pivotal role in directing the high voltage from the ignition coil to the spark plugs in the correct firing order. However, when it's worn, you might experience issues with your vehicle's ignition system.

One of the primary wear-related problems of a distributor cap is moisture intrusion and cap cracks. These issues can severely impact the functionality of your distributor cap, leading to misfires or no spark situation. Here's how you can identify signs of wear:

  1. Visual Inspection: Check for any physical damage like cracks or burns on the cap. These can allow moisture to seep in, which is detrimental to spark generation.
  2. Moisture Buildup: Look for signs of moisture inside the cap. Moisture intrusion can cause short circuits, preventing the spark from being properly distributed.
  3. Corrosion on Terminals: Corroded terminals can impede the flow of electricity, weakening the spark delivered to the spark plugs.
  4. Wear and Tear: General wear can lead to a poor fit with the distributor rotor, affecting the timing and strength of the spark.

If you notice any of these signs, it's likely time to replace your distributor cap. Doing so can restore the efficiency of your vehicle's ignition system, ensuring smooth starts and peak performance.

Damaged Rotor Button

damaged rotor button failure

After addressing distributor cap wear, it's crucial to inspect the rotor button, another key component susceptible to damage that can disrupt spark distribution. The rotor button is responsible for transferring the electrical charge from the ignition coil to the distributor cap and then to the spark plugs. Damage to the rotor button, such as cracks, burns, or excessive wear, can impede this critical transfer, leading to your vehicle's inability to start or run properly.

Corrosion issues and moisture intrusion are common culprits behind rotor button damage. Both can lead to poor electrical conductivity and eventual failure of the component. To make certain your distributor system functions optimally, here's a checklist to assess the health of your rotor button:

Sign to Look For Possible Cause
Physical damage (cracks, burns) Excessive wear or high voltage
Discoloration Overheating attributable to misalignment
Corrosion on the contact points Moisture intrusion or age
Wear and tear Regular use over time
Brittle or broken material Poor quality or excessive age

Faulty Ignition Module

Identifying issues with your ignition module is critical, as it plays a pivotal role in managing the timing and intensity of the engine's spark. A faulty ignition module can lead to a range of problems, including no spark from your distributor. One common sign of trouble is ignition timing issues, which can severely affect your vehicle's performance.

When diagnosing a faulty ignition module, look out for:

  1. Corroded terminals: Corrosion can impede electrical conductivity, leading to erratic or no spark.
  2. Intermittent engine stalling: This could indicate that the ignition module is failing to provide consistent spark.
  3. Engine misfires: Misfires often occur ensure improper timing of the spark, which can be traced back to a malfunctioning module.
  4. No start condition: If your engine refuses to start, a defective ignition module could be at the heart of the problem.

To address these issues, inspect the ignition module for visible signs of damage or corrosion. Use a multimeter to check for continuity and ensure the electrical connections are secure and not corroded. Replacing a faulty ignition module is usually straightforward but requires precision and careful adhere to your vehicle's repair manual to avoid further ignition timing issues.

Poor Electrical Connections

inadequate electrical wiring issues

While addressing issues with the ignition module is a key step, don't overlook the role of poor electrical connections in causing a lack of spark from the distributor. Corroded terminals and loose wiring can greatly disrupt the flow of electricity, rendering your distributor ineffective. It's important to inspect every connection point, from the distributor cap to the ignition coil and spark plugs.

To start, examine the terminals for any signs of corrosion. Corroded terminals hinder the electrical conductivity, preventing the necessary voltage from reaching the spark plugs. If you find any corrosion, clean the terminals thoroughly with a wire brush or replace them if they're beyond repair.

Next, make sure that all wiring is secure and properly connected. Loose wiring can lead to intermittent electrical connections, which might cause your distributor to fail in delivering spark when needed. Check each wire for any signs of wear or damage. Frayed or exposed wires should be replaced immediately to prevent potential short circuits.

Conclusion

To sum up, if your distributor isn't sparking, it's likely because of a faulty ignition coil, a worn distributor cap, a damaged rotor button, a defective ignition module, or poor electrical connections.

You'll need to systematically inspect each component for wear or damage. Start by testing the ignition coil's functionality, then examine the distributor cap and rotor button for any signs of wear or damage. Check the ignition module next, and lastly, make sure all electrical connections are secure and corrosion-free for the best performance.