Recent Posts

How to Reset Maintenance Light on Toyota Corolla


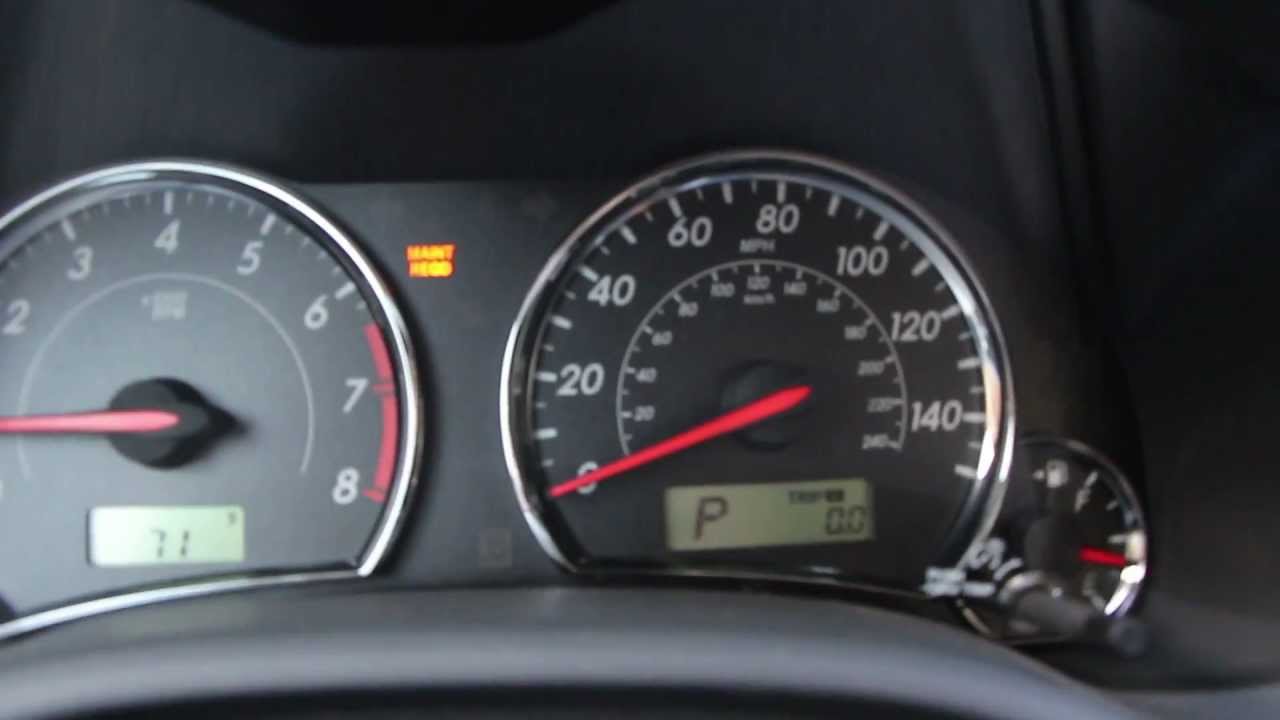
To reset the maintenance light on a Toyota Corolla, turn the key to the “On” position, press and hold the trip reset button, and then turn the key back to the “Off” position while still holding the button.

How to Reset Maintenance Light on Toyota Corolla

Credit: www.mariettatoyota.com

Methods To Reset Maintenance Light On Toyota Corolla

To reset the maintenance light on a Toyota Corolla, insert the key and turn it to the “On” position. Press and hold the trip reset button until “Trip A” appears on the screen. Return the key to the “Off” position and then back to “On” while still holding the button.

Method 1: Using Trip Reset Button
1. Place your key in the ignition, and turn it to the “On” position.
2. Press and hold the trip reset button.
3. Once the words “Trip A” appear, return the key to the “Off” position.
4. While holding the trip reset button down, turn the key back to the “On” position.
Method 2: Disconnecting the Battery
1. Turn off your engine and put on safety glasses and gloves.
2. Locate the negative terminal on your car battery.
3. Using a wrench, loosen the nut on the negative battery terminal and pull the negative connector from the battery.
4. Reconnect the negative cable and re-tighten it using your wrench.
These are two methods you can use to reset the maintenance light on a Toyota Corolla. The first method involves using the trip reset button. Simply place your key in the ignition and turn it to the “On” position. Next, press and hold the trip reset button until the words “Trip A” appear. Then, return the key to the “Off” position while still holding the trip reset button down. Finally, turn the key back to the “On” position. If the first method doesn’t work for you, you can try the second method which involves disconnecting the battery. Start by turning off your engine and putting on safety glasses and gloves. Locate the negative terminal on your car battery and use a wrench to loosen the nut on the negative battery terminal. Pull the negative connector from the battery. After that, reconnect the negative cable and re-tighten it using your wrench.
How to Reset Maintenance Light on Toyota Corolla

Credit: www.reddit.com

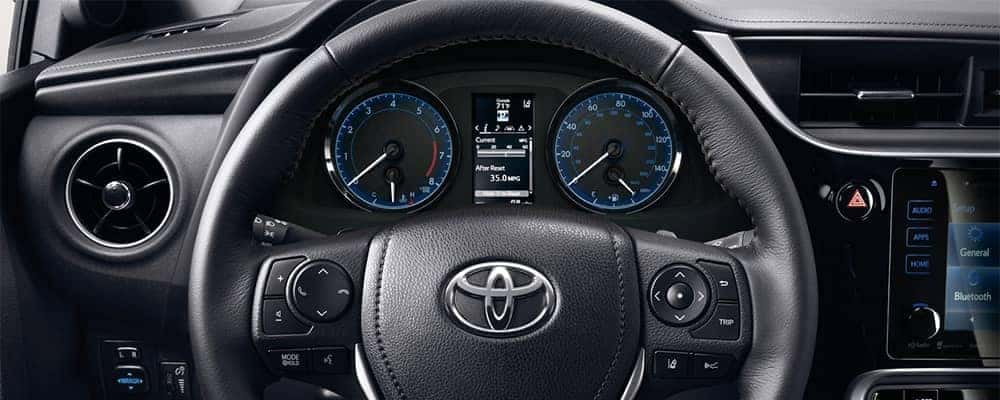
Instructions For Using Trip Reset Button

Instructions for Using Trip Reset Button:

Step 1: Turn the key to the ‘On’ position.

Step 2: Press and hold the trip reset button.

Step 3: Return the key to the ‘Off’ position.

Step 4: Turn the key back to the ‘On’ position.

If you are wondering how to reset the maintenance light on your Toyota Corolla, follow these simple steps using the trip reset button. First, turn the key to the ‘On’ position. Then, press and hold the trip reset button. Next, return the key to the ‘Off’ position. Finally, turn the key back to the ‘On’ position. By following these easy instructions, you will be able to reset the maintenance light on your Toyota Corolla without any hassle. Remember to always refer to your vehicle’s manual for specific instructions and consult a professional if you are unsure or need assistance.


Instructions For Disconnecting The Battery

Here is a simple guide on how to reset the maintenance light on a Toyota Corolla:

  1. Turn off the engine and put on safety glasses and gloves.
  2. Locate the negative terminal on your car battery.
  3. Using a wrench, loosen the nut on the negative battery terminal.
  4. Pull the negative connector from the battery.
  5. Reconnect the negative cable and re-tighten it using your wrench.

Following these steps will help you reset the maintenance light on your Toyota Corolla. Remember to take the necessary safety precautions and consult your vehicle’s manual if you have any doubts.

How to Reset Maintenance Light on Toyota Corolla

Credit: m.youtube.com

Frequently Asked Questions On How To Reset Maintenance Light On Toyota Corolla

How Do You Turn Off The Maintenance Required Light On A 2017 Toyota Corolla?

To turn off the maintenance required light on a 2017 Toyota Corolla, follow these steps: 1. Place your key in the ignition and turn it to the “On” position. 2. Press and hold the trip reset button near the odometer.

3. Once “Trip A” appears on the screen, turn the key to the “Off” position while still holding the trip reset button. 4. With the trip reset button still pressed, turn the key back to the “On” position. The maintenance light should now be reset.

How Do I Erase A 2013 Corolla Maintenance Required Light?

To erase the maintenance required light on a 2013 Corolla, follow these steps: 1. Turn the key to the “On” position. 2. Press and hold the trip reset button near the odometer. 3. After “Trip A” appears on the screen, turn the key to the “Off” position.

4. While holding the trip reset button, turn the key back to the “On” position. 5. Release the trip reset button. The maintenance required light should be reset.

How Do You Reset The Maintenance Light On A Toyota Push To Start?

To reset the maintenance light on a Toyota push to start, turn the key to the “On” position, press and hold the trip reset button, wait for “Trip A” to appear, turn the key to the “Off” position, and release the button.

Done!

Conclusion

Resetting the maintenance light on your Toyota Corolla is a simple process that can save you time and money. By following the steps outlined in this blog post, you can easily reset the maintenance light and keep your Corolla in top condition.

Whether you are a seasoned DIYer or new to car maintenance, these instructions are easy to follow and will help you reset the maintenance light with confidence. Don’t let the maintenance light on your Corolla be a cause for stress – use this guide to reset it and keep your car running smoothly.

How Long Do Toyota Camrys Last


Toyota Camrys can last for hundreds of thousands of miles with proper maintenance and care. With features that help it withstand the test of time, the Toyota Camry is known for its reliability and durability.

How Long Do Toyota Camrys Last

Credit: www.galaxytoyota.net

Factors That Determine Longevity

When it comes to the longevity of Toyota Camrys, there are several factors that determine how long they last. The quality of build plays a significant role in the lifespan of a Camry. Toyota is known for its strong and durable construction, ensuring that the vehicle can withstand regular wear and tear. Additionally, proper maintenance and care are essential for maximizing the longevity of a Camry. Regular servicing, oil changes, and inspections can prevent mechanical issues and extend the lifespan of the vehicle. Moreover, driving habits also play a role in the durability of a Camry. Gentle acceleration, smooth braking, and avoiding harsh driving conditions can contribute to a longer lifespan.

How Long Do Toyota Camrys Last

Credit: www.bergetoyota.com

Average Lifespan Of Toyota Camrys

When it comes to the average lifespan of a Toyota Camry, research findings and statistics show that these vehicles can last a long time, with many examples reaching high mileage. The Camry is known for its reliability and durability, allowing it to remain on the road for hundreds of thousands of miles. The Toyota Camry has a reputation for being a well-crafted midsize sedan with features that contribute to its longevity. Many people have reported that their Camrys have lasted them for many years without any major issues. While the exact lifespan can vary depending on factors such as maintenance, driving habits, and environmental conditions, it is not uncommon to find Toyota Camrys that have been on the road for well over a decade. Overall, Toyota Camrys are known for their longevity and can provide reliable transportation for many years.

Longevity Of Different Camry Generations

The longevity of different generations of Toyota Camrys can vary. When it comes to early models, they have been known to last for many years with proper maintenance. These older models, such as those from the early 2000s, have a reputation for being durable and reliable.

On the other hand, recent models of Toyota Camry have continued this tradition of longevity. With advancements in technology and engineering, newer Camrys are designed to last even longer. The introduction of hybrid models has further enhanced the lifespan of these vehicles.

Overall, Toyota Camrys have a good track record for lasting a long time. With regular maintenance and care, they can often reach hundreds of thousands of miles. So whether you’re driving an older Camry or a newer one, you can have confidence in its durability and longevity.

How Long Do Toyota Camrys Last

Credit: www.kingstoyota.com

Tips To Extend The Lifespan Of A Toyota Camry

Toyota Camrys are known for their longevity and reliability. With proper care and regular maintenance, a Toyota Camry can last for many years.

Regular maintenance is the key to extending the lifespan of a Toyota Camry. This includes routine oil changes, tire rotations, and brake inspections. Keeping up with these maintenance tasks can prevent premature wear and tear on the vehicle.

Replacing worn parts is another important step in prolonging the life of a Toyota Camry. This includes replacing the timing belt, spark plugs, and filters as recommended by the manufacturer.

Additionally, practicing good driving habits can also help extend the lifespan of a Toyota Camry. Avoiding aggressive driving, excessive idling, and unnecessary heavy loads can reduce strain on the engine and other components.

In conclusion, by following a regular maintenance schedule, replacing worn parts, and adopting good driving habits, you can ensure that your Toyota Camry lasts for many years to come.

Frequently Asked Questions On How Long Do Toyota Camrys Last

Can A Toyota Camry Last 500 000 Miles?

A Toyota Camry can last up to 500,000 miles with proper maintenance and care.

Is Toyota Camry A Long Lasting Car?

Yes, the Toyota Camry is a long-lasting car known for lasting hundreds of thousands of miles.

What Is Considered High Mileage For A Toyota Camry?

A high mileage for a Toyota Camry is generally considered to be around 200,000 to 300,000 miles.

Conclusion

Toyota Camrys have a well-deserved reputation for lasting a long time. These reliable vehicles are built with quality craftsmanship and come equipped with features that contribute to their longevity. With proper maintenance and care, Camrys have been known to last hundreds of thousands of miles.

Whether you’re browsing used options or considering a new purchase, you can trust that a Toyota Camry will be a reliable companion for years to come.


How to Change Battery in Toyota Rav4 Key Fob?


How to Change Battery in Toyota Rav4 Key Fob? To change the battery in a Toyota Rav4 key fob, remove the key from the fob, open the fob, remove the green circuit board, replace the battery, and put the fob back together. It’s important to replace the battery every year or two to prevent any issues with unlocking your car.

How to Change Battery in Toyota Rav4 Key Fob

Removing The Key Fob Shell

Replacing the battery in your Toyota Rav4 key fob is a simple process that you can do yourself. To begin, you’ll need to remove the key fob shell. Start by taking off the key ring from the fob.

Next, remove the back shell of the key fob by carefully prying it open. Once the back shell is removed, you can then take off the remote fob shell.

To access the battery, you’ll need to remove the green circuit board. Once the circuit board is removed, replace the battery with a new one. Afterward, put the fob back together and reattach the key ring.

That’s it! You have successfully changed the battery in your Toyota Rav4 key fob. Remember to replace the battery every year or two as part of regular maintenance to ensure your fob continues to function properly.

How to Change Battery in Toyota Rav4 Key Fob

Replacing The Battery

To change the battery in your Toyota Rav4 key fob, you will need to follow a few simple steps.

First, remove the back cover of the key fob by using a small flathead screwdriver or a coin to twist and unlock it.

Once the back cover is removed, locate the battery inside and carefully remove it using a pair of tweezers or your fingers.

Take note of the battery type (usually a CR2032) and purchase a replacement battery of the same type. Insert the new battery into the key fob, making sure it is properly aligned.

Then, secure the back cover back into place until it clicks. Your Toyota Rav4 key fob should now have a new battery and be ready to use. Remember to properly dispose of the old battery in a designated recycling bin.

How to Change Battery in Toyota Rav4 Key Fob

FAQ

How Do You Replace The Battery In A Rav4 Key?

To replace the battery in a RAV4 key, follow these steps:

1. Remove the key from the fob.

2. Open the fob and remove the green circuit board.

3. Replace the battery.

4. Put the fob back together and place the key back in.

It’s important to replace the battery every year or two for optimal performance.

What Size Battery Goes In A Toyota Rav4 Key Fob?

The Toyota RAV4 key fob uses a battery that needs to be replaced every year or two for optimal performance. To replace the battery, open the key fob, remove the green circuit board, replace the battery, put the fob back together, and place the key back in.

Can I Replace The Key Fob Battery Myself?

Yes, you can replace the key fob battery yourself. Simply open the fob, remove the green circuit board, replace the battery, and put it back together. It’s a good idea to replace the battery every year or two for proper functioning.

Wrapping Up

To ensure your Toyota Rav4 key fob continues to function properly, it’s important to know how to change the battery. By following the step-by-step instructions provided in this blog post, you can easily replace the battery in your key fob and avoid getting locked out of your vehicle.

Remember to perform this maintenance task every year or two to ensure the smooth operation of your key fob. Don’t let a dead battery ruin your day – take care of it today!