Recent Posts

How to Reset Maintenance Light on 2007 Toyota 4Runner


To reset the maintenance light on a 2007 Toyota 4Runner, turn the ignition key to the “off” position, then press and hold the trip meter reset button. While holding the button, turn the ignition key to the “on” position, and continue holding the button until the maintenance light goes out.

Resetting the maintenance light on your 2007 Toyota 4Runner is a simple process that can be completed in a matter of minutes. Routine maintenance is essential to keep your vehicle in optimal condition, and resetting the maintenance light is an important step in acknowledging that the required maintenance has been successfully completed.

By following a few easy steps, you can ensure that your vehicle’s maintenance light is reset, allowing you to continue driving with confidence.

How to Reset Maintenance Light on 2007 Toyota 4Runner

Credit: www.toyota-4runner.org

Reasons For Maintenance Light

Are you wondering how to reset the maintenance light on your 2007 Toyota 4Runner? We’ve got you covered with a step-by-step guide to help you clear that pesky notification and keep your vehicle running smoothly.

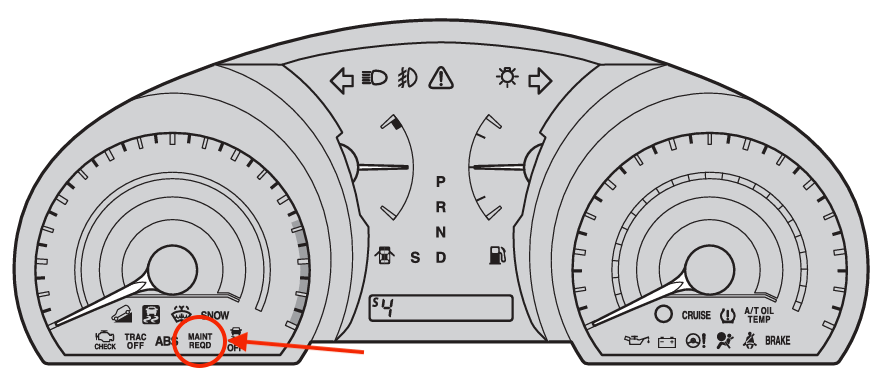
Reasons for Maintenance Light H3: Significance of maintenance light The maintenance light on your 2007 Toyota 4Runner indicates that it’s time for regular service and inspections. Ignoring this warning may lead to potential mechanical issues. Addressing the maintenance light promptly can help prevent major repairs and keep your vehicle in optimal condition. H3: Potential causes for maintenance light The maintenance light may illuminate for various reasons, signaling the need for attention to specific areas of your vehicle. Some potential causes include: – Low engine oil level – Dirty or clogged air filters – Worn-out spark plugs – Failing oxygen sensorsFaulty fuel injectorLoose gas cap By addressing these issues promptly, you can maintain the performance and longevity of your 4Runner while ensuring a safe driving experience.

Steps To Reset Maintenance Light

How to Reset Maintenance Light on 2007 Toyota 4Runner

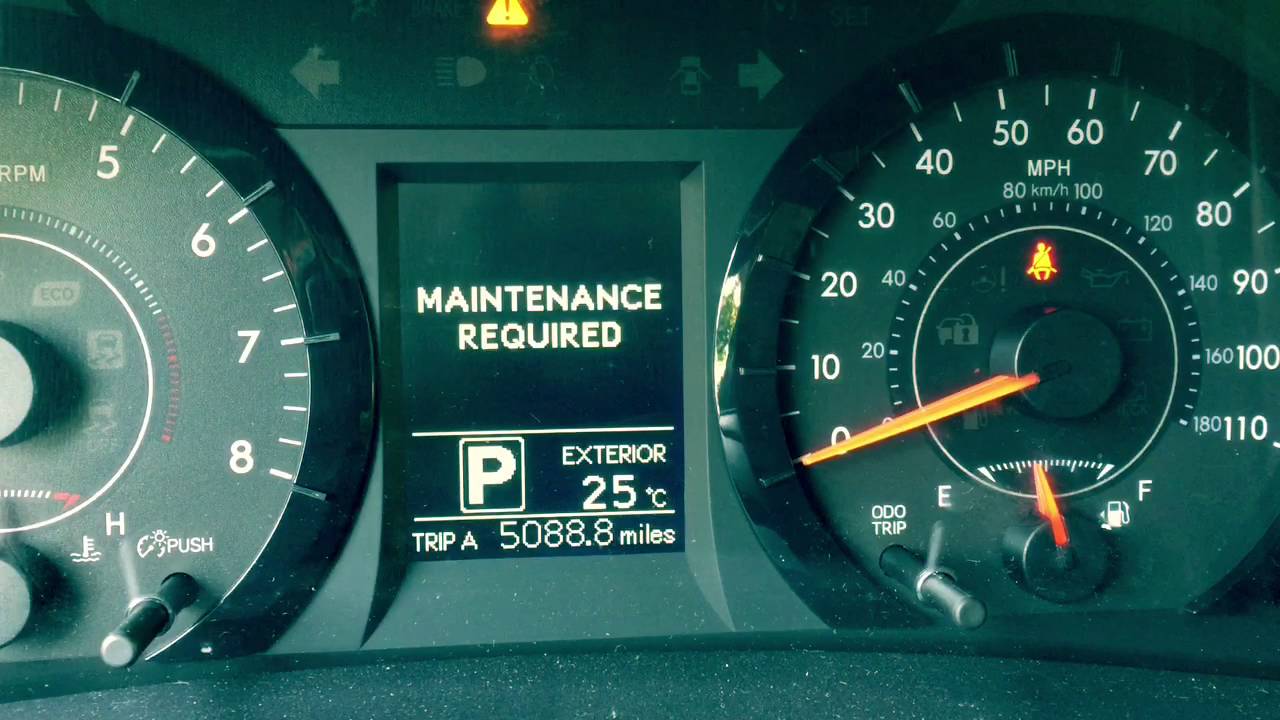
If the maintenance light on your 2007 Toyota 4Runner has been illuminated due to an oil change or other routine maintenance, it’s essential to know how to reset it. Here are the steps to reset the maintenance light on your vehicle so that you can ensure its proper maintenance without any unnecessary distractions.

Locating The Reset Button

When you’re ready to reset the maintenance light on your 2007 Toyota 4Runner, start by locating the reset button. This button is typically found beneath the dashboard, near the steering column. Refer to your vehicle’s manual for the exact location if you’re having trouble finding it.

Procedure For Resetting The Maintenance Light

  1. Make sure the ignition is turned off to begin the reset process.
  2. Insert your key into the ignition and turn it to the “on” position without starting the engine.
  3. Locate the reset button and press it until you see the maintenance light blink and then turn off. This may take a few seconds.
  4. Once the light has turned off, release the reset button. The maintenance light has now been successfully reset.
  5. Start the engine to confirm that the maintenance light no longer remains illuminated.
  6. If the light stays off, the reset process is complete, and your vehicle is ready for the road.

Common Mistakes To Avoid

When resetting the maintenance light on your 2007 Toyota 4Runner, it’s important to be aware of common mistakes that can hinder the process.

Not Following The Correct Procedure

Following the correct reset procedure is crucial to ensure the maintenance light is properly reset, avoiding any confusion or potential issues.

Ignoring The Maintenance Light

Ignoring the maintenance light can lead to overlooking important maintenance tasks, potentially causing damage to your vehicle in the long run.

How to Reset Maintenance Light on 2007 Toyota 4Runner

Credit: m.youtube.com

How to Reset Maintenance Light on 2007 Toyota 4Runner

Credit: carsandbids.com

Frequently Asked Questions Of How To Reset Maintenance Light On 2007 Toyota 4runner

How Do I Reset The Maintenance Light On My 2007 Toyota 4runner?

To reset the maintenance light on your 2007 Toyota 4Runner, follow these simple steps:
1. Insert the key into the ignition and turn it to the “ON” position (do not start the engine). 2. Locate the trip meter button and press it until you see “ODO” displayed on the instrument panel. 3. Turn the key back to the “OFF” position and then press and hold the trip meter button. 4. While holding the button, turn the key to the “ON” position (do not start the engine) and continue to hold the button for about 5 seconds or until the display begins to flash. 5. Release the trip meter button and the maintenance light should now be reset.

Why Is The Maintenance Light On My 2007 Toyota 4runner Flashing?

If the maintenance light on your 2007 Toyota 4Runner is flashing, it indicates that there is a more serious issue with your vehicle that requires immediate attention. It is recommended to have your vehicle diagnosed by a qualified mechanic to determine the exact cause of the issue and prevent further damage.

How Often Should I Reset The Maintenance Light On My 2007 Toyota 4runner?

You should reset the maintenance light on your 2007 Toyota 4Runner after each scheduled maintenance service, such as an oil change or tire rotation. This helps to keep track of when your vehicle is due for its next service and ensures that necessary maintenance is not overlooked.

Conclusion

Resetting the maintenance light on your 2007 Toyota 4Runner is a simple task that can save you time and money. By following the steps outlined in this blog post, you can easily take control of your vehicle’s maintenance reminders. Keep your 4Runner running smoothly and efficiently with this quick and easy process.


How to Reset Oil Maintenance Light on 2012 Toyota Highlander


To reset the oil maintenance light on a 2012 Toyota Highlander, turn the vehicle to the “off” position, then press and hold the “Trip/Odometer” button while turning the ignition key to the “on” position. Release the button when the light resets.

If you own a 2012 Toyota Highlander, it’s essential to stay on top of your vehicle’s maintenance, including resetting the oil maintenance light when necessary. The oil maintenance light is a crucial indicator for keeping your Highlander in top condition, ensuring the engine runs smoothly and efficiently.

By following some simple steps, you can easily reset the oil maintenance light on your 2012 Toyota Highlander, allowing you to maintain your vehicle’s peak performance. In this guide, we’ll walk you through the simple process to reset the oil maintenance light and keep your Highlander running smoothly.

How to Reset Oil Maintenance Light on 2012 Toyota Highlander

Credit: www.brentbrowntoyota.com

Step-by-step Guide To Resetting The Oil Maintenance Light

Learn how to easily reset the oil maintenance light on your 2012 Toyota Highlander with this simple step-by-step guide.

Checking The Maintenance Required Light

Make sure the maintenance required light is illuminated on your dashboard.

Turning On The Ignition

Insert the key and turn the ignition to the ‘On’ position without starting the engine.

Holding The Odometer Button

Locate the odometer button and hold it down until the odometer reading is displayed.

Resetting The Light

Press and hold the odometer button while turning the ignition key to the ‘Off’ position.

Turn the ignition back to the ‘On’ position while still holding the odometer button.

Continue holding the button until the maintenance light resets and turns off.

How to Reset Oil Maintenance Light on 2012 Toyota Highlander

Credit: www.youtube.com

How to Reset Oil Maintenance Light on 2012 Toyota Highlander

Credit: oilreset.com

Frequently Asked Questions For How To Reset Oil Maintenance Light On 2012 Toyota Highlander

How Do I Reset The Oil Maintenance Light On My 2012 Toyota Highlander?

To reset the oil maintenance light on your 2012 Toyota Highlander, follow these simple steps:
1. Turn the ignition switch to the “On” position without starting the engine. 2. Locate and press the “Trip” button until the ODO (odometer) display appears. 3. Turn the ignition off. 4. Press and hold the “Trip” button while turning the ignition back to the “On” position. 5. Continue to hold the “Trip” button until the ODO display changes to show all zeros. 6. Release the “Trip” button and turn the ignition off. 7. Your oil maintenance light should now be reset.

How Often Does The Oil Maintenance Light Come On In A 2012 Toyota Highlander?

The oil maintenance light in a 2012 Toyota Highlander is designed to come on to remind you to change your oil at regular intervals. Generally, it comes on every 5,000 miles or every 6 months, whichever comes first. It’s important to follow the recommended maintenance schedule in your vehicle’s manual to ensure optimal performance and longevity of your engine.

Can I Reset The Oil Maintenance Light Without Changing The Oil?

While it is possible to reset the oil maintenance light without changing the oil, it is not recommended. The oil maintenance light serves as a reminder to change the oil and filter in your vehicle, as regular oil changes are essential for proper engine function and longevity.

Ignoring the maintenance light and not changing the oil can lead to decreased performance, increased fuel consumption, and even engine damage. It’s best to follow your vehicle’s recommended maintenance schedule and change the oil when indicated by the light.

Conclusion

Keeping your Toyota Highlander in top condition is crucial for its longevity. By following these simple steps, you can easily reset the oil maintenance light on your 2012 model. Regular maintenance is key to ensuring your vehicle runs smoothly and efficiently.

Stay proactive and enjoy a well-maintained vehicle for years to come.


How to Reset Maintenance Light on Toyota Sienna 2017


To reset the maintenance light on a 2017 Toyota Sienna, first, turn the ignition to the “On” position, but do not start the engine. Press the “Trip” button to display the trip meter A or B, then turn the ignition off.

While holding down the trip reset button, turn the ignition back to the “On” position. Continue holding the trip reset button until the maintenance light resets. Finally, turn the ignition off and back on to confirm that the maintenance light has been reset.

Owning a 2017 Toyota Sienna means staying on top of maintenance, including resetting the maintenance light after completing a service. Following the simple steps outlined can help you reset the maintenance light on your Sienna, ensuring that you have a clear reminder for when your next service is due. This will also save you time and money, as you won’t have to visit a dealership or mechanic for this simple task. Understanding your car’s maintenance indicators is essential for keeping your vehicle in top condition.

Step-by-step Guide To Resetting The Maintenance Light

Learn how to easily reset the maintenance light on your Toyota Sienna 2017 with this step-by-step guide. Quickly clear the light without the need for a trip to the dealership. Effortlessly keep your vehicle in optimal condition with these simple instructions.

Step-by-Step Guide to Resetting the Maintenance Light

Resetting the maintenance light on your Toyota Sienna 2017 is a simple process that can be done in just a few steps. Follow the guide below to clear the maintenance light on your vehicle and ensure it stays in top condition.

Checking the Ignition Status

1. Before starting, make sure the ignition is turned off to begin the reset process.
2. Locate the trip odometer button on the instrument cluster of your Toyota Sienna.

Pressing and Holding the Trip Odometer

1. Press and hold the trip odometer button while turning the ignition key to the ‘ON’ position.
2. Continue holding the trip odometer button until the maintenance light starts flashing, indicating that the reset process has begun.

Turning the Ignition to the ‘ON’ Position

1. Once the maintenance light starts flashing, turn the ignition key back to the ‘OFF’ position briefly.
2. Turn the ignition key again to the ‘ON’ position while still holding the trip odometer button.

Releasing the Trip Odometer Button

1. Release the trip odometer button when the maintenance light stops flashing.
2. The maintenance light should now be reset, indicating that the procedure was successful.

Confirming the Reset

1. Start the engine of your Toyota Sienna to confirm that the maintenance light has been reset.
2. Ensure the light does not appear again, indicating that the reset was done correctly.

By following these simple steps, you can quickly reset the maintenance light on your Toyota Sienna 2017 and keep track of your vehicle’s service schedule.

How to Reset Maintenance Light on Toyota Sienna 2017

Credit: www.youtube.com

Potential Issues And Troubleshooting

When it comes to resetting the maintenance light on a Toyota Sienna 2017, you may encounter a few potential issues that could prevent the successful reset of the light. Here are some troubleshooting tips to help you resolve these issues:

Maintenance Light Keeps Coming On

If the maintenance light in your Toyota Sienna 2017 keeps coming on after resetting, it could indicate that there is an unresolved issue with the vehicle that needs attention. It is advisable to check for any underlying problems such as low oil levels, worn-out spark plugs, or a faulty oxygen sensor. Addressing these issues promptly can help prevent the recurrence of the maintenance light.

Maintenance Light Does Not Reset

If the maintenance light does not reset after following the correct procedure, there could be a few reasons behind this issue. First, ensure that you are following the correct steps as outlined in the vehicle’s manual. Additionally, check the oil level and quality to ensure it meets the manufacturer’s specifications. If the light still does not reset, it may be necessary to seek assistance from a qualified mechanic to diagnose any potential system malfunctions that could be preventing the reset.

Tips For Proper Vehicle Maintenance


Regular maintenance of your vehicle is essential to ensure its longevity and optimal performance. By following these tips for proper vehicle maintenance, you can keep your Toyota Sienna 2017 in top condition and minimize the need for costly repairs and replacements in the future.

Regularly Scheduled Maintenance

Regularly scheduled maintenance ensures that your Toyota Sienna 2017 operates at its best. Stick to the maintenance schedule outlined in your owner’s manual, which includes oil and filter changes, air filter replacement, and inspections of various components such as brakes, suspension, and steering system.

Checking Fluid Levels

Regularly checking your vehicle’s fluid levels is crucial for proper maintenance. Ensure that the engine oil, coolant, brake fluid, and transmission fluid are at the recommended levels. Low fluid levels can lead to engine damage and other mechanical issues.

Tire Maintenance

Maintaining proper tire pressure and tread depth is vital for safety and performance. Check the tire pressure regularly and ensure it matches the recommended levels specified in the owner’s manual. Additionally, inspect the tires for signs of wear and tear and replace them when necessary.

Replacing Worn-out Parts

Worn-out parts such as brake pads, spark plugs, and timing belts should be replaced according to the manufacturer’s recommendations. Ignoring worn-out parts can lead to decreased performance and potential safety hazards.

Keeping Track Of Service Records

Keeping track of your vehicle’s service records is essential for maintaining its value and ensuring that all necessary maintenance tasks are completed on time. Maintain a record of all the services and repairs performed, including the date, mileage, and details of the work carried out.


Frequently Asked Questions Of How To Reset Maintenance Light On Toyota Sienna 2017

How Do I Reset The Maintenance Light On My Toyota Sienna 2017?

To reset the maintenance light on your Toyota Sienna 2017, follow these simple steps:
1. Turn on the ignition without starting the engine. 2. Press and hold the trip meter reset button. 3. While holding the button, turn the ignition off and then back on. 4. Continue holding the button until the maintenance light flashes and then goes off. 5. Release the button and you’re done! Your maintenance light is now reset.

Why Is The Maintenance Light On In My Toyota Sienna 2017?

The maintenance light in your Toyota Sienna 2017 indicates that it’s time for regular vehicle maintenance. It’s a reminder to have your car serviced and important inspections performed to keep it running smoothly and avoid potential issues.

How Often Should I Reset The Maintenance Light On My Toyota Sienna 2017?

You should reset the maintenance light on your Toyota Sienna 2017 each time you have completed the recommended maintenance tasks specified in your vehicle’s owner’s manual. This ensures that the light accurately reflects when your next service is due.

Conclusion

Keep up with regular maintenance to ensure your Toyota Sienna 2017 runs smoothly. Resetting the maintenance light is a simple task that you can easily do at home. Following the steps outlined in this guide will help you keep your vehicle in top condition without any hassle.

Remember, proper maintenance leads to longevity.

How to Charge 2014 Toyota Prius Hybrid Battery


The 2014 Toyota Prius is a popular hybrid vehicle known for its energy efficiency and low emissions. One of the most vital components of the Prius is its hybrid battery, which powers the electric motor alongside the internal combustion engine. In this article, we will explore the various methods for charging the hybrid battery of a 2014 Toyota Prius.

Charging the Battery

There are two primary methods for charging the battery of a 2014 Toyota Prius: through regenerative braking and via an external power source. Regenerative braking allows the vehicle’s kinetic energy to be converted into electrical energy and stored in the battery. However, for a more substantial charge, connecting the Prius to an external power supply is necessary.

External Charging

To charge the 2014 Toyota Prius using an external power source, you will need to use a charging cable specifically designed for hybrid vehicles. Most Prius models come equipped with a standard charging cable that can be plugged into a typical household outlet. Alternatively, there are also specialized charging stations that can provide a faster and more efficient charge.

When connecting the charging cable to the Prius:

  • Ensure that the vehicle is switched off and in park
  • Locate the charging port, typically located at the front of the vehicle
  • Plug the charging cable securely into the port
  • Once connected, the Prius will indicate that it is charging

Charging Time

The time required to fully charge the 2014 Toyota Prius hybrid battery depends on several factors, including the capacity of the battery, the level of depletion, and the charging source. Using a standard household outlet, a full charge typically takes around 8-12 hours. However, with a specialized charging station, this time can be reduced significantly to approximately 2-4 hours.

Regenerative Braking

The 2014 Toyota Prius utilizes regenerative braking to capture and convert the kinetic energy produced during braking into electrical energy. This energy is then used to recharge the hybrid battery. The process is entirely automated, requiring no input from the driver, and is a key characteristic of the Prius’s energy-efficient design.

 
How to Charge 2014 Toyota Prius Hybrid Battery

Importance of Charging

Ensuring that the hybrid battery of the 2014 Toyota Prius is adequately charged is essential for maximizing fuel efficiency and vehicle performance.

A well-maintained battery allows the vehicle to operate in electric mode for more extended periods, reducing the overall consumption of gasoline and minimizing emissions. Regular charging also contributes to the longevity of the battery and helps preserve its storage capacity.

 
How to Charge 2014 Toyota Prius Hybrid Battery

FAQ

How Often Should I Charge The 2014 Toyota Prius Hybrid Battery?

To optimize battery life, it is recommended to charge the 2014 Toyota Prius Hybrid battery at least once every few weeks or whenever the charge level drops below 50%.

Can I Charge The Toyota Prius Hybrid Battery Using A Regular Electric Outlet?

Yes, you can charge the 2014 Toyota Prius Hybrid battery using a regular 120V electric outlet. However, it will take longer to charge compared to using a dedicated charging station.

Is It Necessary To Fully Charge The Toyota Prius Hybrid Battery Every Time?

No, it is not necessary to fully charge the 2014 Toyota Prius Hybrid battery every time. Charging it to around 80% will still provide sufficient power for regular usage while helping to prolong the battery’s lifespan.


2012 Hyundai Veloster Dual Clutch Problems, Symptoms, Causes and How to Fix


The 2012 Hyundai Veloster has been reported to experience significant issues with its dual-clutch transmission (DCT). Owners have reported symptoms such as gears slipping or slamming during shifts, delayed or early shifting, and in some cases, complete transmission failure. The root causes of these problems are often attributed to defects in the transmission control module (TCM) and the clutch assembly itself. To address these issues, Hyundai has issued recalls and technical service bulletins (TSBs) recommending software updates for the TCM and, in severe cases, complete transmission replacement. Owners facing these problems should consult a Hyundai dealership or a qualified mechanic for diagnosis and repair.

2012 Hyundai Veloster common Dual Clutch Problems

  • Gears slipping or slamming during shifts
  • Delayed or premature shifting
  • Grinding noises from the transmission
  • Transmission fluid leaks
  • Car going into limp mode
  • Hesitation during acceleration
  • Complete transmission failure
  • High RPMs with poor acceleration
  • Odd noises during gear changes
  • Transmission seizing up and preventing the car from driving

Potential Causes

The 2012 Hyundai Veloster with a dual-clutch transmission (DCT) is known to experience several potential problems and their causes, which can be listed as follows:

  • Defective transmission control module (TCM)
  • Faulty clutch actuators or clutch assembly
  • Overheating issues due to inadequate heat dissipation design
  • Software glitches or programming errors in the TCM
  • Mechanical wear or failure of internal transmission components
  • Transmission fluid leaks or contamination
  • Electrical issues or sensor failures affecting transmission operation
  • Improper maintenance or lack of regular fluid changes
  • Manufacturing defects or quality control issues

How to Diagnose Dual Clutch Issues in Your 2012 Hyundai Veloster?

Here are some steps to diagnose dual clutch transmission issues in a 2012 Hyundai Veloster:

  1. Check for any diagnostic trouble codes related to the transmission control module (TCM) or dual clutch transmission (DCT) system using an OBD2 scan tool. Common codes include P0700 (transmission control system malfunction), P0776 (solenoid valve stuck), P0777 (clutch stuck off), etc.
  2. Inspect the transmission fluid level and condition. Low or burnt fluid can cause shifting issues.
  3. Listen for any abnormal noises like grinding, whining or rattling from the transmission area during operation, which may indicate internal component failure.
  4. Test if the transmission goes into all forward gears and reverse properly. Issues like slipping, harsh shifts, or inability to shift into certain gears can point to clutch pack or mechatronic sleeve issues.
  5. Check for any transmission warning lights illuminated on the dash, like the “D” light flashing, which indicates a transmission fault.
  6. Perform a road test to check for delayed engagements, juddering, or complete lack of power delivery during acceleration, which are common dual clutch symptoms.
  7. Use a scan tool to run the TCM relearn/reset procedure if any components were replaced or disconnected. This can help reestablish proper clutch operation.
  8. Inspect electrical connections to the TCM and clutch actuators for any damage, corrosion or loose fits causing communication errors.

How to Fix 2012 Hyundai Veloster Dual Clutch Problems– Step by step

To fix dual clutch transmission (DCT) problems in a 2012 Hyundai Veloster, follow these steps:

Step 1: Diagnose the Issue

  1. Scan for Diagnostic Trouble Codes (DTCs): Use an OBD2 scanner to check for any transmission-related codes.
  2. Inspect Transmission Fluid: Check the fluid level and condition. Low or burnt fluid can indicate issues.
  3. Listen for Noises: Identify any grinding, whining, or rattling sounds from the transmission.
  4. Road Test: Observe for symptoms like slipping, harsh shifts, or delayed engagement.

Step 2: Prepare for Repair

Tools and Supplies:

  • OBD2 scanner
  • Transmission fluid (OEM recommended)
  • Funnel and pump for fluid
  • Basic hand tools (sockets, wrenches)
  • Safety equipment (gloves, eye protection)

Step 3: Change Transmission Fluid

  1. Lift the Vehicle: Use a hydraulic jack and support it with jack stands.
  2. Remove Undercover: Take off the protective cover under the car to access the transmission.
  3. Drain Fluid:
  • Locate the drain plug and use a 24mm socket to remove it.
  • Allow the fluid to drain completely into a catch pan.

Step 4: Update Transmission Control Module (TCM) Software

  1. Connect Scan Tool: Attach a scan tool capable of updating the TCM software.
  2. Perform Software Update: Follow the scan tool instructions to update the TCM software to the latest version.

Step 5: Relearn Transmission Adaptations

  1. Clear Shift Adaptations: Use the scan tool to clear existing shift adaptations.
  2. Relearn Procedure:
  • Ensure the transmission fluid is at the correct temperature.
  • Accelerate from a stop, allowing the transmission to shift through all gears, then decelerate to a stop. Repeat this process five times.
  • Perform several forced downshifts at various throttle openings.
  • Move the shift lever through all positions (P, N, D, R) with the brake pedal depressed, stopping for a few seconds in each position.

Step 6: Inspect and Replace Faulty Components

  1. Check Clutch Actuators: Inspect the clutch actuators for wear or damage. Replace if necessary.
  2. Inspect Wiring and Connections: Ensure all electrical connections to the TCM and actuators are secure and free of corrosion.
  3. Replace TCM if Needed: If issues persist, consider replacing the TCM.

Step 7: Final Checks

  1. Test Drive: Conduct a thorough test drive to ensure the transmission operates smoothly.
  2. Monitor for Issues: Keep an eye on any warning lights or abnormal behavior.

Repairing 2012 Hyundai Veloster Dual Clutch Problems: DIY or Professional Help?

Deciding between DIY or seeking professional help for repairing dual clutch problems in a 2012 Hyundai Veloster involves weighing several factors, including the complexity of the issue, the availability of specialized tools, and one’s mechanical expertise.

DIY Approach

Pros:

  • Cost Savings: Handling the repair yourself can significantly reduce costs, primarily by eliminating labor charges.
  • Learning Experience: It’s an opportunity to deepen your understanding of your vehicle’s mechanics.

Cons:

  • Complexity: Dual clutch systems are intricate, and repairs often require specialized knowledge and tools. For instance, replacing the clutch assembly or addressing transmission control module issues involves steps that might be challenging for an amateur mechanic.
  • Risk of Further Damage: Incorrect repairs can lead to more significant problems, potentially increasing repair costs in the long run.
  • Tool Availability: Some repairs, like clutch assembly replacement, require specific tools that might not be readily available to the average car owner.

Professional Help

Pros:

  • Expertise: Professionals have the necessary experience and tools to diagnose and repair complex issues accurately. For example, diagnosing problems with the transmission control module or clutch actuators requires a level of expertise that professionals possess.
  • Warranty: Repairs done by certified technicians often come with a warranty, providing peace of mind.
  • Time Efficiency: Professionals can usually complete repairs more quickly than an amateur, minimizing vehicle downtime.

Cons:

  • Cost: Professional repairs can be expensive, especially for significant issues like complete transmission replacement, which can cost several thousand dollars.
  • Finding a Trustworthy Mechanic: It can be challenging to find a reliable and honest mechanic who specializes in Hyundai dual clutch systems.

2012 Hyundai Veloster Dual Clutch Problems Repairing Cost

The 2012 Hyundai Veloster equipped with a dual-clutch transmission (DCT) is known to experience several issues that can lead to costly repairs or even complete transmission replacement. Here are some common problems and their associated repair costs:

Transmission Failure

If the dual-clutch transmission fails completely, the repair cost can range from $3,000 to $8,000 for a replacement transmission. This includes the cost of the transmission itself, labor, and any necessary programming or calibration.

Clutch Pack Replacement

One of the most common issues with the Veloster’s DCT is the failure of the clutch pack. Replacing the clutch pack alone can cost between $1,200 and $2,000, including parts and labor. Special tools and expertise are required for this repair.

Transmission Control Module (TCM) Issues

Problems with the TCM, such as software glitches or electrical faults, can lead to erratic shifting, hesitation, or complete transmission failure. Replacing the TCM can cost between $500 and $1,000, depending on the dealership or repair shop.

Clutch Actuator Replacement

Faulty clutch actuators can cause difficulty shifting gears or jerky shifts. Replacing one or both clutch actuators can cost between $800 and $1,500, including parts and labor.

Transmission Fluid Flush

While not a repair per se, a transmission fluid flush is recommended every 30,000 to 60,000 miles for the Veloster’s DCT. This service can cost between $150 and $300.

Preventing Future Dual Clutch Problems in 2012 Hyundai Veloster

To prevent future dual clutch transmission (DCT) problems in a 2012 Hyundai Veloster, consider the following proactive measures:

Regular Maintenance

  • Transmission Fluid Changes: Regularly change the transmission fluid according to the manufacturer’s recommended intervals. This helps maintain optimal lubrication and cooling of the transmission components.
  • Software Updates: Ensure that the transmission control module (TCM) software is up-to-date. Hyundai often releases software updates to address known issues and improve transmission performance.

Driving Habits

  • Avoid Aggressive Driving: Aggressive driving can cause excessive wear on the clutch assembly. Smooth and gradual acceleration and deceleration can help prolong the life of the transmission.
  • Minimize Stop-and-Go Traffic: Frequent stop-and-go driving can lead to overheating and increased wear on the clutch. When possible, avoid heavy traffic conditions.

Inspections and Diagnostics

  • Regular Inspections: Have the transmission inspected regularly by a qualified mechanic. Early detection of issues can prevent more severe problems.
  • Monitor for Symptoms: Be vigilant for any signs of transmission issues, such as slipping gears, delayed shifting, or unusual noises. Addressing these symptoms early can prevent further damage.

Address Known Issues

  • Recall and Service Bulletins: Check for any recalls or technical service bulletins (TSBs) related to the DCT. Hyundai has issued recalls and TSBs to address specific transmission problems.
  • Replace Worn Components: If any components, such as the clutch assembly or dual-mass flywheel, show signs of wear, replace them promptly to avoid more extensive damage.

Cooling System

  • Ensure Proper Cooling: Overheating can exacerbate transmission issues. Ensure that the vehicle’s cooling system is functioning correctly and that the transmission cooler, if equipped, is in good condition.

Professional Help

  • Qualified Mechanics: For any transmission-related repairs or maintenance, seek help from mechanics who have experience with Hyundai’s dual-clutch systems. Proper diagnosis and repair are crucial for preventing future issues.

Can I drive my 2012 Hyundai Veloster with a malfunctioning Dual Clutch?

No, you should not drive a 2012 Hyundai Veloster with a malfunctioning dual-clutch transmission (DCT).

The transmission may shift gears unpredictably, causing jerky or harsh movements that can be dangerous, especially in traffic. The transmission might slip out of gear, leading to a sudden loss of power, which can be hazardous while driving.

    How to Turn off RCTA on Toyota


    Turning off the RCTA (Rear Cross Traffic Alert) system in your Toyota can be useful in certain situations, such as when towing a trailer or when the system is providing too many alerts in a congested parking lot. This guide will provide you with the necessary steps to turn off the RCTA feature in your Toyota vehicle.

    Step 1: Locate the Settings Menu

    First, ensure that your vehicle is in park and the ignition is turned on. Then, locate the settings menu on your vehicle’s infotainment screen. This is typically accessed through the touchscreen display or using the physical buttons on the center console.

    Step 2: Access the Vehicle Settings

    Once you have accessed the settings menu, navigate to the “Vehicle Settings” or “Driver Assistance Settings” option. This is where you can find the specific settings related to the RCTA feature and other driver assistance systems in your Toyota.

    Step 3: Disable RCTA

    Within the vehicle settings, look for an option related to the RCTA system. It may be listed as “RCTA,” “Rear Cross Traffic Alert,” or something similar. Select this option to access the RCTA settings.

    Step 4: Turn off the RCTA System

    Once you have accessed the RCTA settings, you should see an option to enable or disable the system. Select the disable option to turn off the RCTA feature in your Toyota. Some vehicles may require you to confirm this action to complete the process.

    How to Turn off Rcta on Toyota

    Step 5: Verify the Status

    After disabling the RCTA system, it’s important to verify that the feature has been turned off. You can do this by looking for a visual indicator on the infotainment screen or checking the vehicle’s owner’s manual for any specific indicators related to the RCTA system status.

    Step 6: Re-Enable if Needed

    If there comes a time when you want to turn the RCTA system back on, simply follow the same steps outlined above, but select the enable option in the RCTA settings menu.

    How to Turn off Rcta on Toyota

    Important Considerations

    Keep in mind that disabling the RCTA system may affect the overall safety and awareness while driving, especially when backing out of parking spaces or driveways. It’s essential to be fully aware of your surroundings and use caution when the RCTA feature is turned off.

    Additionally, it’s recommended to familiarize yourself with the specific steps and settings for your particular Toyota model, as the menu options and layout can vary between different vehicles and model years.

    FAQ

    How Do I Turn Off Rcta On Toyota?

    To turn off RCTA on your Toyota vehicle, go to the settings menu on the infotainment screen. Look for the “RCTA” or “Rear Cross Traffic Alert” option and select “Off”.

    Can I Disable The Rcta Feature Temporarily?

    Yes, you can temporarily disable the RCTA feature on your Toyota. Simply press the RCTA button, usually located on the dashboard or near the side mirrors, to turn off the system. Remember to turn it back on when needed for safer driving.

    Is It Possible To Permanently Disable Rcta On My Toyota?

    While you cannot permanently disable the RCTA feature, you can customize its behavior to suit your preferences. In the settings menu, you can adjust the sensitivity or volume of the alerts, making the system less intrusive without completely turning it off.

    Conclusion

    By following these step-by-step instructions, you should be able to successfully turn off the RCTA system in your Toyota vehicle when needed. Remember to prioritize safety and awareness while driving, and consider re-enabling the RCTA feature when it’s appropriate for your driving situation.