Recent Posts

2006 Saturn Vue Oil Capacity


The 2006 Saturn Vue has an oil capacity of 5 quarts.

2006 Saturn Vue Oil Capacity

Credit: www.stockwiseauto.com

Saturn Vue Oil Capacity

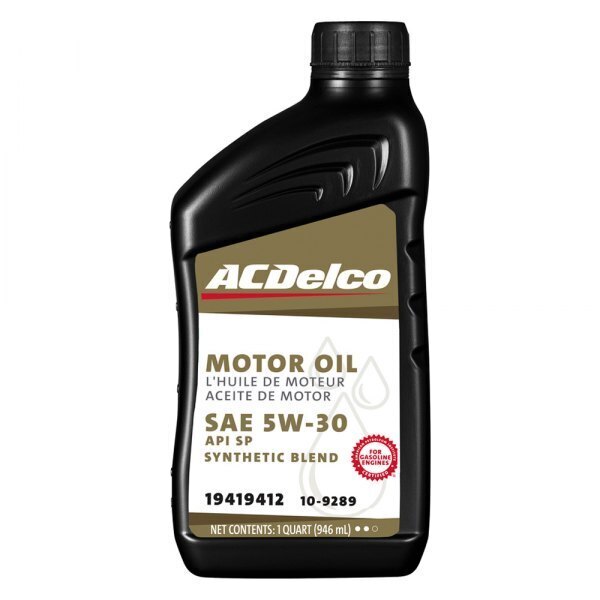
The 2006 Saturn Vue oil capacity is 5 quarts, according to Amsoil and other sources.

Saturn Vue Oil Capacity
5W-30
5 Quarts
Amsoil
SaturnFans.com
AutoZone

Finding The Right Oil Capacity

When it comes to finding the right oil capacity for a 2006 Saturn Vue, there are several online resources that can help. Car forums like SaturnFans.com can provide valuable insights and advice from fellow vehicle owners who have first-hand experience with the Vue. Additionally, automobile catalogs such as Automobile Catalog can offer detailed specifications and information on oil capacity for different vehicle models. Specialized websites like oil-change.info and SearchForParts.com can also provide specific details on oil capacity for the 2006 Saturn Vue. By utilizing these online resources, owners of the 2006 Saturn Vue can easily find the correct oil capacity and ensure proper maintenance of their vehicle.

Benefits Of Using The Correct Oil Capacity

Using the correct oil capacity for your 2006 Saturn Vue is crucial for experiencing the full potential of your vehicle. With the right oil capacity, you can enjoy optimal performance, increased engine longevity, and improved fuel efficiency.

When it comes to performance, using the recommended oil capacity ensures that your engine is properly lubricated, reducing friction and wear. This allows your vehicle to operate at its best, delivering smooth acceleration and responsive handling.

Additionally, using the correct oil capacity helps extend the life of your engine. Proper lubrication reduces the risk of overheating and excessive wear, preventing costly repairs down the line. By following the manufacturer’s guidelines, you can maximize the lifespan of your vehicle’s engine.

Moreover, using the right oil capacity can also improve fuel efficiency. Well-lubricated engines experience less friction, which means less energy is wasted and more power is transferred to the wheels. This translates to better fuel economy, saving you money at the pump.

2006 Saturn Vue Oil Capacity

Credit: www.youtube.com

Importance Of Regular Oil Changes

Regular oil changes are incredibly important for the overall health and longevity of your vehicle’s engine.

By regularly changing the oil, you can prevent engine damage and keep your vehicle running smoothly. Neglecting to change the oil can lead to a buildup of dirt and debris, causing friction and wear on the engine components. This can result in decreased performance and even engine failure.

Not only does regular oil changes prevent engine damage, but it also helps to maintain your vehicle’s warranty. Many manufacturers require proof of regular maintenance, including oil changes, to keep the warranty valid. So, by staying up to date on your oil changes, you can preserve your warranty coverage and avoid any potential disputes.

Additionally, regular oil changes can help preserve the resale value of your vehicle. Potential buyers often look at the maintenance history of a used vehicle, and a well-documented record of regular oil changes can significantly increase its value.

Tips For Changing The Oil

2006 Saturn Vue Oil Capacity
Tips for Changing the Oil
Gather Necessary Tools

To change the oil in a 2006 Saturn Vue, you will need the following tools:

  • Oil filter wrench
  • Oil drain pan
  • Funnel
  • Rags or paper towels
Drain the Old Oil

Before starting the oil change, make sure the engine is cool. Locate the oil drain plug underneath the vehicle. Place the drain pan under the plug, then use a wrench to carefully loosen and remove the plug. Allow the old oil to drain completely.

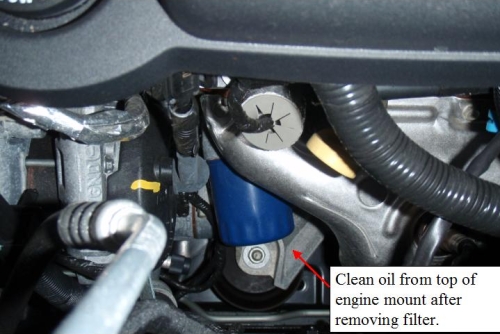
Replace the Oil Filter

After draining the old oil, locate the oil filter. Use an oil filter wrench to remove the old filter. Make sure to lubricate the gasket on the new filter with fresh oil before installing it in place. Tighten the filter according to the manufacturer’s instructions.

Pour in the New Oil

Once the new filter is in place, replace the drain plug and secure it tightly. Use a funnel to pour in the recommended amount of new oil. Consult the vehicle’s manual or the manufacturer’s website for the correct oil capacity.

Dispose of Old Oil Properly

After completing the oil change, make sure to properly dispose of the old oil. Many local automotive stores and recycling centers accept used motor oil for proper disposal. Avoid pouring it down drains or onto the ground, as it can harm the environment.

2006 Saturn Vue Oil Capacity

Credit: www.saturnfans.com

Frequently Asked Questions Of 2006 Saturn Vue Oil Capacity

What Kind Of Oil Does A 2006 Saturn Vue 2.2 L Take?

The 2006 Saturn Vue 2. 2 L requires 5 quarts of 5W-30 oil. You can find this information on websites like amsoil. com, saturnfans. com, and automobile-catalog. com.

What Kind Of Oil Does A Saturn Vue V6 Take?

The Saturn Vue v6 takes 5W-30 oil, with a capacity of 5 quarts. You can find more information on the Amsoil website or by visiting SaturnFans. com or JustAnswer. Alternatively, you can check with AutoZone or other car parts retailers for the appropriate oil.

How Many Quarts Of Oil Does A 2.2 Saturn Ion Take?

A 2. 2 Saturn Ion takes 5 quarts of oil. You can find more information on recommended oil types in the owner’s manual or by visiting reputable automotive websites.

Conclusion

With the proper understanding of the oil capacity for your 2006 Saturn Vue, you can ensure that your vehicle is well-maintained and running smoothly. By following the manufacturer’s recommendation of using 5 quarts of 5W-30 oil, you can keep your engine in optimal condition.

Regular oil changes are important for the longevity and performance of your vehicle. Remember to consult the owner’s manual or a trusted mechanic for any specific instructions or variations for your specific model. Take care of your Saturn Vue, and it will continue to serve you well for years to come.


2012 Chevy Cruze Timing Chain Replacement


The cost of a 2012 Chevy Cruze timing chain replacement can vary, but it typically ranges from $91.95 to $248.98. Symptoms of a bad timing chain include engine misfires, unusual noise coming from the engine, and difficulty starting the car.

It is important to replace the timing chain when these symptoms arise to prevent further engine damage. Can I replace just the timing chain? Yes, it is possible to replace just the timing chain if it is the only component that needs to be replaced.

However, it is recommended to inspect and replace other related components such as the timing chain guides and tensioner to ensure optimal performance and longevity of the engine.

2012 Chevy Cruze Timing Chain Replacement

Credit: vi.aliexpress.com

Symptoms Of A Bad Timing Chain

Common signs of a bad timing chain in a 2012 Chevy Cruze include noise and loss of power. The timing chain is responsible for maintaining the proper synchronization between the engine’s valves and pistons. When the timing chain becomes worn or damaged, it can cause a variety of symptoms. One common symptom is noise, such as a rattling or grinding sound coming from the engine. This noise may be more noticeable at startup or during acceleration. Another symptom is a loss of power, as the timing chain may not be able to properly control the timing of the engine’s valves. This can result in a decrease in performance and acceleration. If you experience any of these symptoms, it is recommended to have your timing chain inspected and replaced if necessary.

2012 Chevy Cruze Timing Chain Replacement

Credit: www.amazon.com

Cost Of Timing Chain Replacement

Cost of Timing Chain Replacement:

  • Wholesale GM Parts Online – $91.95
  • ZZ Performance – $39.77
  • Amazon.com – $99.99

Online Prices:

  • GM Parts Direct – $204.99
  • RockAuto – $88.88
  • CarParts.com – $53.49

When it comes to replacing the timing chain on your 2012 Chevy Cruze, the cost can vary depending on where you purchase the parts. Wholesale GM Parts Online offers the lowest price at $91.95, while ZZ Performance and Amazon.com also provide competitive prices. If you prefer to buy online, GM Parts Direct, RockAuto, and CarParts.com offer alternative options. It’s important to compare prices to ensure you get the best deal.


How To Know If Your Timing Chain Needs Replacing

Signs to look for when testing the chain:

  • Engine Misfires and Stalling: If you notice your engine misfiring or stalling frequently, it could be a sign that your timing chain is worn out and needs replacing.
  • Noisy Engine: A rattling or grinding noise coming from the engine could indicate a loose or damaged timing chain.
  • Engine Won’t Start: If your engine fails to start or takes longer to start than usual, it could be due to a faulty timing chain.
  • Check Engine Light: The check engine light may illuminate if there is an issue with the timing chain.
  • Poor Performance: A worn timing chain can cause a decrease in engine performance, leading to reduced power and fuel efficiency.
2012 Chevy Cruze Timing Chain Replacement

Credit: m.youtube.com

Step-by-step Guide To Timing Chain Replacement

The 2012 Chevy Cruze may require a timing chain replacement, and here is a step-by-step guide to help you through the process.

First, you’ll need a few tools to get started, including a timing chain tool, socket wrench set, and a torque wrench.

Next, you’ll need to remove the serpentine belt. Loosen the tensioner pulley and slide the belt off the engine.

After that, it’s time to remove the timing cover. Use a socket wrench to remove the bolts and carefully pry off the cover.

Finally, you can install the new timing chain. Align the timing marks on the sprockets and use the timing tool to hold them in place. Then, carefully install the new chain and tighten the bolts to the specified torque.

Remember to refer to the manufacturer’s instructions and consult a professional if needed. With these steps, you can successfully replace the timing chain in your 2012 Chevy Cruze.

Why Timing Chain Replacement Is Important

Replacing the timing chain in a 2012 Chevy Cruze is crucial for several reasons. The timing chain plays a vital role in the engine’s performance, ensuring that the valves open and close at the correct times. This synchronization prevents engine damage and keeps it running smoothly.

Over time, the timing chain can stretch or wear out, leading to poor engine performance. Replacing it is necessary to maintain optimal performance and prevent further damage. If left unattended, a faulty timing chain can cause engine misfires, reduced fuel efficiency, and even engine failure.

When it comes to timing chain replacement, it’s important to consult a professional mechanic or follow the manufacturer’s guidelines. They will determine the appropriate time for replacement based on the vehicle’s mileage and condition.

Overall, it’s essential to prioritize timing chain replacement to ensure the longevity and reliability of your Chevy Cruze’s engine.

Frequently Asked Questions Of 2012 Chevy Cruze Timing Chain Replacement

How Much Does It Cost To Replace A Timing Chain On A 2012 Chevy Cruze?

The cost to replace a timing chain on a 2012 Chevy Cruze varies. On average, it can range from $500 to $1,500, depending on the location and the labor rates. It is recommended to get an accurate estimate from a certified mechanic or dealership.

When Should A Timing Belt Be Replaced On A 2012 Chevy Cruze?

The timing belt on a 2012 Chevy Cruze should be replaced according to the manufacturer’s recommended maintenance schedule. Check your owner’s manual or consult a mechanic for the specific mileage or time interval. Failure to replace the timing belt can result in engine damage.

How Do I Know If My Timing Chain Needs Replacing?

You may need to replace your timing chain if you experience symptoms such as engine misfires, rough idle, poor acceleration, or a rattling noise coming from the engine. It’s best to consult a professional mechanic to accurately diagnose and address this issue.

Conclusion

The 2012 Chevy Cruze timing chain replacement is a necessary procedure to maintain the health and performance of the vehicle. Whether it’s due to wear and tear or symptoms like engine noise or loss of power, replacing the timing chain ensures smooth operation.

While it may seem like a daunting task, there are various resources available, including online tutorials and professional assistance. By addressing this issue promptly, you can prevent further damage and costly repairs down the road. Keep your Chevy Cruze running smoothly with a timely timing chain replacement.

Read Engine Codes


To read engine codes, you can use a scan tool or alternative methods if you don’t have access to one. Using your odometer or ignition key can help retrieve diagnostic trouble codes to determine the cause of your check engine light.

AutoZone offers a free Fix Finder service that reads check engine, ABS, and maintenance lights and provides a detailed report. Additionally, you can buy an inexpensive scanner to read the code yourself, especially for older cars with minor issues. By understanding how to read engine codes, you can diagnose and address problems with your vehicle quickly and effectively.

Why Are Engine Codes Important?

Understanding the importance of engine codes is crucial for every car owner. Engine codes, also known as diagnostic trouble codes (DTCs), are alphanumeric codes generated by the onboard computer system of a vehicle. These codes provide valuable information about the health and functioning of the engine. By reading engine codes, car owners can benefit in several ways:

  • Diagnosing Issues: Engine codes help identify the specific problem causing the check engine light to illuminate. By knowing the code, car owners can pinpoint the issue and take appropriate action.
  • Cost Savings: By reading engine codes, car owners can avoid unnecessary trips to mechanics for minor issues that can be resolved easily.
  • Timely Maintenance: Engine codes can indicate potential issues before they become major problems, helping car owners stay proactive with maintenance and prevent costly repairs.

Therefore, it is essential for car owners to be aware of how to read engine codes and understand their significance in maintaining the performance and longevity of their vehicles.

How To Read Engine Codes

There are different methods to read engine codes, including using a scan tool, the odometer, or the ignition key. Using a scan tool is a popular and efficient way to retrieve engine codes. By plugging in the scan tool’s DLC connector and turning the key on with the engine off, you can easily read the codes and diagnose any issues.

If a scan tool is not available, another option is to use the odometer or ignition key to retrieve diagnostic trouble codes (DTCs). Although not ideal, these alternatives can effectively determine the cause of your check engine light. By following the specific instructions for your vehicle, you can retrieve the codes and diagnose any problems.

There are also other resources available, such as AutoZone, where you can get assistance in reading engine codes for free. AutoZone offers a Fix Finder service that reads check engine lights and provides an easy-to-understand report with recommendations for fixing the issue.

Overall, it’s essential to understand how to read engine codes to effectively diagnose and address any problems with your vehicle.

Scan Tools To Use

When it comes to reading engine codes, there are several scan tools that you can use. One option is the Cen-tech OBD II Code Reader, which is a popular choice among car owners. It allows you to plug in the DLC connector and turn the key on with the engine off. Once connected, you can easily read and diagnose codes, which can help you determine what’s going on with your vehicle.

Another option is the BlueDriver Bluetooth Pro OBDII Scan, a wireless scan tool that connects to your smartphone or tablet via Bluetooth. It provides detailed information about your vehicle’s engine codes, allowing you to diagnose and fix any issues.

Lastly, AutoZone offers the Innova Diagnostic Tool, which is available for purchase or can be borrowed for free from their stores. This tool is user-friendly and provides accurate and reliable diagnostic information.

Overall, the choice of scan tool will depend on your specific needs and preferences. Whether you choose the Cen-tech OBD II Code Reader, the BlueDriver Bluetooth Pro OBDII Scan, or the Innova Diagnostic Tool at AutoZone, these scan tools are all effective in helping you read engine codes and diagnose any problems with your vehicle.

Read Engine Codes

Credit: www.yourmechanic.com

Alternatives To Code Readers

There are alternative ways to read engine codes if you don’t have a code reader. One option is to use your odometer or ignition key. Although not ideal, these methods can effectively retrieve diagnostic trouble codes to determine the cause of your check engine light. Another option is to buy an inexpensive scanner and read the code yourself. This is a good choice if you have an older car with minor issues. Additionally, you can visit AutoZone for a free code reading service. Their Fix Finder tool can quickly diagnose check engine, ABS, and maintenance lights. It takes less than a minute to get a report and they can even recommend a trusted local shop if you need help with the fix.

If you want to learn more about reading engine codes, there are plenty of resources available online, including YouTube tutorials and articles from reputable sources like Endurance Warranty and NerdWallet. With these alternatives, you don’t have to worry about not having a code reader. You can diagnose check engine light issues without any professional assistance.

Additional Resources

When it comes to checking engine codes without a code reader, there are alternative methods available. If you do not have access to an automotive diagnostic scanner, you can still retrieve diagnostic trouble codes using your odometer or ignition key. Although not ideal, these methods can effectively determine the cause of your check engine light.

AutoZone offers a free Fix Finder service that reads Check Engine, ABS, and maintenance lights. The service takes less than a minute and provides a report that is easy to understand. If you need help with the fix, AutoZone’s Fix Finder will recommend a trusted local shop.

If you prefer to diagnose the check engine light yourself, you can buy an inexpensive scanner and read the code on your own. This option is particularly beneficial for older cars that might occasionally show a check engine light for minor problems.

Understanding OBD-II codes and how to read them is crucial in diagnosing and fixing issues with your vehicle. With the right knowledge and tools, you can effectively address any problems indicated by engine codes.

Read Engine Codes

Credit: www.yourmechanic.com

Read Engine Codes

Credit: www.endurancewarranty.com

Frequently Asked Questions Of Read Engine Codes

How Do I Read Obd2 Scanner Codes?

To read OBD2 scanner codes, follow these steps: 1. Plug in the DLC connector. 2. Turn the key on with the engine off. 3. Read and diagnose the codes. 4. Punch the codes into the computer to determine the issue.

Can You Check Engine Codes Without A Code Reader?

Yes, you can check engine codes without a code reader by using alternative methods such as using your odometer or ignition key. These methods can effectively retrieve diagnostic trouble codes to determine the cause of your check engine light.

Does Autozone Read Codes For Free?

Yes, AutoZone offers free code reading services. The codes can help diagnose the issue behind your check engine light. They also provide a Fix Finder service that gives you an easy-to-understand report and recommends trusted local shops for repairs.

Conclusion

Understanding how to read engine codes is essential for car owners. With the right diagnostic scanner, you can easily retrieve trouble codes and diagnose issues with your vehicle. However, if you don’t have access to a scanner, there are alternative methods, such as using your odometer or ignition key.

AutoZone even offers a free Fix Finder service to help you understand and fix the issue. By learning how to read engine codes, you can save time and money on repairs and keep your car running smoothly.


How Long Do Toyota Camrys Last


Toyota Camrys can last for hundreds of thousands of miles with proper maintenance and care. With features that help it withstand the test of time, the Toyota Camry is known for its reliability and durability.

How Long Do Toyota Camrys Last

Credit: www.galaxytoyota.net

Factors That Determine Longevity

When it comes to the longevity of Toyota Camrys, there are several factors that determine how long they last. The quality of build plays a significant role in the lifespan of a Camry. Toyota is known for its strong and durable construction, ensuring that the vehicle can withstand regular wear and tear. Additionally, proper maintenance and care are essential for maximizing the longevity of a Camry. Regular servicing, oil changes, and inspections can prevent mechanical issues and extend the lifespan of the vehicle. Moreover, driving habits also play a role in the durability of a Camry. Gentle acceleration, smooth braking, and avoiding harsh driving conditions can contribute to a longer lifespan.

How Long Do Toyota Camrys Last

Credit: www.bergetoyota.com

Average Lifespan Of Toyota Camrys

When it comes to the average lifespan of a Toyota Camry, research findings and statistics show that these vehicles can last a long time, with many examples reaching high mileage. The Camry is known for its reliability and durability, allowing it to remain on the road for hundreds of thousands of miles. The Toyota Camry has a reputation for being a well-crafted midsize sedan with features that contribute to its longevity. Many people have reported that their Camrys have lasted them for many years without any major issues. While the exact lifespan can vary depending on factors such as maintenance, driving habits, and environmental conditions, it is not uncommon to find Toyota Camrys that have been on the road for well over a decade. Overall, Toyota Camrys are known for their longevity and can provide reliable transportation for many years.

Longevity Of Different Camry Generations

The longevity of different generations of Toyota Camrys can vary. When it comes to early models, they have been known to last for many years with proper maintenance. These older models, such as those from the early 2000s, have a reputation for being durable and reliable.

On the other hand, recent models of Toyota Camry have continued this tradition of longevity. With advancements in technology and engineering, newer Camrys are designed to last even longer. The introduction of hybrid models has further enhanced the lifespan of these vehicles.

Overall, Toyota Camrys have a good track record for lasting a long time. With regular maintenance and care, they can often reach hundreds of thousands of miles. So whether you’re driving an older Camry or a newer one, you can have confidence in its durability and longevity.

How Long Do Toyota Camrys Last

Credit: www.kingstoyota.com

Tips To Extend The Lifespan Of A Toyota Camry

Toyota Camrys are known for their longevity and reliability. With proper care and regular maintenance, a Toyota Camry can last for many years.

Regular maintenance is the key to extending the lifespan of a Toyota Camry. This includes routine oil changes, tire rotations, and brake inspections. Keeping up with these maintenance tasks can prevent premature wear and tear on the vehicle.

Replacing worn parts is another important step in prolonging the life of a Toyota Camry. This includes replacing the timing belt, spark plugs, and filters as recommended by the manufacturer.

Additionally, practicing good driving habits can also help extend the lifespan of a Toyota Camry. Avoiding aggressive driving, excessive idling, and unnecessary heavy loads can reduce strain on the engine and other components.

In conclusion, by following a regular maintenance schedule, replacing worn parts, and adopting good driving habits, you can ensure that your Toyota Camry lasts for many years to come.

Frequently Asked Questions On How Long Do Toyota Camrys Last

Can A Toyota Camry Last 500 000 Miles?

A Toyota Camry can last up to 500,000 miles with proper maintenance and care.

Is Toyota Camry A Long Lasting Car?

Yes, the Toyota Camry is a long-lasting car known for lasting hundreds of thousands of miles.

What Is Considered High Mileage For A Toyota Camry?

A high mileage for a Toyota Camry is generally considered to be around 200,000 to 300,000 miles.

Conclusion

Toyota Camrys have a well-deserved reputation for lasting a long time. These reliable vehicles are built with quality craftsmanship and come equipped with features that contribute to their longevity. With proper maintenance and care, Camrys have been known to last hundreds of thousands of miles.

Whether you’re browsing used options or considering a new purchase, you can trust that a Toyota Camry will be a reliable companion for years to come.


2007 Hyundai Santa Fe Valve Cover Gasket Replacement


The cost to replace a valve cover gasket on a 2007 Hyundai Santa Fe can vary depending on the location and the shop you choose. However, you can expect to pay an average of around $150 to $250 for the replacement.

It is recommended to replace the valve cover gasket to prevent oil loss, protect engine parts, and maintain the cleanliness of the cylinder and pistons. When it comes to the valve cover gasket replacement on a 2007 Hyundai Santa Fe, the cost can range from $150 to $250, depending on the location and shop you choose.

It is important to address any signs of a leak and replace the valve cover gasket to prevent oil loss, protect other engine parts, and keep the cylinder and pistons free from dirt and other particles.

Diy Valve Cover Gasket Replacement

Replace the valve cover gasket on your 2007 Hyundai Santa Fe with this easy DIY guide. Protect your engine from oil damage and prevent leaks by addressing any signs of a worn-out gasket as soon as possible.

Tools And Materials Needed

Tools Materials
Socket set Valve cover gasket
Ratchet RTV sealant
Torque wrench Non-residual solvent
Screwdriver

1. Removal of Ignition Coils: Start by removing the ignition coils using a socket set.

2. Removing the Valve Cover: Once the ignition coils are removed, you can proceed to remove the valve cover using a ratchet and screwdriver.

3. Preparing the Valve Cover and Gasket: Clean the gasket surface of the head with a non-residual solvent. Apply a bead of RTV sealant across the seam where the front cover and head mate. Set the valve cover gasket in place.

4. Reinstalling the Valve Cover: Secure the valve cover in place using the appropriate bolts and torque wrench. Start the engine to ensure everything is properly sealed.

2007 Hyundai Santa Fe Valve Cover Gasket Replacement

Credit: www.ebay.com

Cost Of Valve Cover Gasket Replacement

The cost of valve cover gasket replacement for a 2007 Hyundai Santa Fe can vary depending on the mechanic and location, but on average, it can range from $200 to $400. It is important to address any signs of a leak as soon as possible to prevent oil loss and further engine damage.

Replacing a valve cover gasket on a 2007 Hyundai Santa Fe can involve some costs. On average, the cost of valve cover gasket replacement for a Hyundai Santa Fe can range from $200 to $400. This cost includes both the parts and labor. The labor cost may vary depending on the location and the mechanic’s hourly rate. It usually takes about 2-3 hours for a professional mechanic to complete the replacement. However, it is worth noting that the actual cost may vary based on the specific model of the Hyundai Santa Fe and any additional repairs or parts replacements that may be required. It is always recommended to consult with a professional mechanic to get an accurate cost estimate for the valve cover gasket replacement on a Hyundai Santa Fe.

Where To Buy Valve Cover Gaskets

Looking to buy valve cover gaskets for your 2007 Hyundai Santa Fe? Check out online retailers like AutoZone, Advance Auto Parts, and Hyundai OEM Parts Direct for a wide selection of options at affordable prices. Plus, they offer convenient delivery options for your convenience.

Online Retailers Local Auto Parts Stores
When it comes to buying valve cover gaskets online, there are several options available. One of the most popular online retailers for auto parts is AutoZone. They offer a wide range of valve cover gaskets for various car models, including the 2007 Hyundai Santa Fe. Another online retailer to consider is O’Reilly Auto Parts, which also offers a selection of valve cover gaskets with free delivery on orders over $50. If you prefer to buy valve cover gaskets from a local auto parts store, Advance Auto Parts is a reputable option. They have a variety of valve cover gaskets in stock and offer a 45-day return policy. Additionally, you can check with other local auto parts stores in your area to see if they carry valve cover gaskets for the 2007 Hyundai Santa Fe.
It is important to choose a reliable source for your valve cover gasket replacement to ensure quality and compatibility with your Hyundai Santa Fe. Whether you choose to buy online or visit a local store, make sure to check the specifications and reviews of the product before making a purchase.
2007 Hyundai Santa Fe Valve Cover Gasket Replacement

Credit: m.youtube.com

2007 Hyundai Santa Fe Valve Cover Gasket Replacement

Credit: www.hyundai-forums.com

Frequently Asked Questions For 2007 Hyundai Santa Fe Valve Cover Gasket Replacement

How Much Does It Cost To Replace A Valve Cover Gasket On A Hyundai Santa Fe?

The cost to replace a valve cover gasket on a Hyundai Santa Fe can vary depending on factors like location and the specific shop or mechanic you choose. Generally, the cost can range from $200 to $400.

How Many Hours Does It Take To Replace A Valve Cover Gasket?

Replacing a valve cover gasket typically takes approximately 2-3 hours.

Can I Replace A Valve Cover Gasket Myself?

Yes, you can replace a valve cover gasket yourself. It is a relatively simple task that can be done with basic tools. Make sure to follow proper instructions and use the correct gasket for your specific vehicle.

Conclusion

To ensure the optimal performance and longevity of your 2007 Hyundai Santa Fe, it’s essential to address any leaks in the valve cover gasket promptly. A well-functioning valve cover gasket prevents oil loss, protects engine parts, and keeps the cylinder and pistons clean.

When considering the cost of replacement, it’s important to compare estimates and assess the hours required for the job. Whether you decide to replace the valve cover gasket yourself or seek professional help, taking action to fix any leaks is crucial in maintaining the overall health of your Hyundai Santa Fe.

Tail Lights Genesis Coupe


Tail lights for the Genesis Coupe can be replaced with LED options, offering a modern and stylish look. These LED tail lights are available from various sellers such as ProTuningLab and TopGearAutosport.com, with prices ranging from $225.96 to $392.88.

Additionally, there are YouTube tutorials available on how to open and replace the tail lights of the Genesis Coupe, with step-by-step instructions provided by Zac Cook. LED tail light bulbs can be a cost-effective and easy replacement for old incandescent bulbs, providing improved visibility and durability.

Replacing a tail light is a simple procedure that can be done by any DIY enthusiast with minimal effort.

Options For Tail Lights Genesis Coupe

Upgrade your Genesis Coupe with sleek and stylish tail lights. Options include AmeriLite LED Bar Replacement Taillights Set, Factory Manufacturer LED Tail Lamp Rear Lights, and SPPC Red Lens LED Taillights Pair, giving your car a modern and eye-catching look.

Easily replace your old incandescent bulbs with LED bulbs for a simple DIY upgrade.

Options for Tail Lights Genesis Coupe
Top Brands Prices and Deals
AmeriLite LED Bar Replacement Taillights Set for Hyundai Genesis Coupe (Black) $251.94
RGB Spec-D Tail Lights $368.95
Factory Manufacturer LED Tail Lamp Rear Lights for Hyundai Genesis Coupe with Running/Sequential Signal Reverse DRL $325.00
Sppc Red Lens LED Taillights Pair for Hyundai Genesis Coupe Pair $266.55
Vland Factory LED Tail Lights for Hyundai Genesis Coupe $329.99
Replacing the old incandescent taillight bulbs in your car with state-of-the-art LED bulbs is a simple task that can be done by any DIY enthusiast with minimal effort. LED bulbs offer improved visibility and durability. They are also more energy-efficient, saving you money in the long run. Additionally, there are various options available in the market for tail lights for the Genesis Coupe. Some of the top brands include AmeriLite, RGB Spec-D, and Factory Manufacturer LED Tail Lamp. These brands offer different styles and features to suit your preferences. When considering purchasing tail lights, it’s important to compare prices and deals from different sellers.
Tail Lights Genesis Coupe

Credit: lightexcel.com

Installing Tail Lights On Genesis Coupe

Upgrade your Genesis Coupe with new tail lights for a sleek and modern look. Easily replace your old lights with LED bulbs for enhanced visibility and style.

Swapping Spec D Tail Lights
If you’re looking to modify the tail lights on your Genesis Coupe, swapping them with Spec D tail lights is a popular option. The process involves opening and modifying the existing tail lights to install the new ones. To start, you’ll need a few tools such as a screwdriver and plastic welding supplies. First, cut open the tail light housing and remove the back housing and lens. Next, disconnect the wires and reassemble the new tail light. Plastic welding may be required to ensure a secure fit. Overall, this process allows you to customize the look of your Genesis Coupe and give it a unique touch.
Opening and Modifying Eagle Eye Tail Lights
Another option for tail light modification is opening and modifying Eagle Eye tail lights. Similar to the process for Spec D tail lights, you’ll need various tools including plastic welding supplies. Start by trimming the tail light dowel and removing the screws, back housing, and light housing. Then, remove the tail light housing and reinstall it with plastic welding. Finally, install the fin to complete the modified tail light. This process allows for customization and gives your Genesis Coupe a unique look. Consider exploring different tail light options and finding the one that suits your style and preferences.

Recommended Tail Lights For Genesis Coupe

When it comes to tail lights for Genesis Coupe, there are a few recommended options to consider. One popular choice is the RGB Spec-D Tail Lights, which offer a stylish and customizable lighting experience. These lights are designed to fit the Genesis Coupe perfectly and can be controlled remotely to change colors and patterns. Another option is the Factory Manufacturer LED Tail Lamp Rear Lights, which come with running/sequential signal and reverse DRL features. These lights not only enhance visibility but also add a modern touch to the vehicle’s appearance. Lastly, the Sppc Red Lens LED Taillights Pair is another great choice as it provides a sleek and sporty look. These taillights are designed for a perfect fit and easy installation. Whether you prefer RGB lights, LED tail lamps, or red lens taillights, there are options available to suit your style and preference.

Tail Lights Genesis Coupe

Credit: www.anzousa.com

Replacing Tail Light Bulbs With Leds

Replacing tail light bulbs with LEDs is a simple process that can offer several benefits. LED bulbs are known for their longevity, energy efficiency, and enhanced brightness. By replacing your traditional incandescent bulbs with LED options, you can experience improved visibility on the road, making it safer for you and other drivers. LED bulbs also have a faster response time, meaning they illuminate instantly, helping to avoid accidents caused by delayed lighting. Additionally, LED bulbs are available in a wide range of colors and styles, allowing you to customize the appearance of your tail lights. The procedure for replacing the bulbs may vary depending on the make and model of your car, but it typically involves removing the old bulb and inserting the new LED bulb. It is essential to consult the vehicle’s manual or seek professional help if needed.

Common Issues With Tail Lights

Tail lights on the Genesis Coupe can experience common issues such as burnt-out bulbs or faulty wiring. To address these problems, consider replacing traditional incandescent bulbs with LED bulbs for improved performance and longevity. Visit reputable online retailers or contact a local mechanic for affordable tail light replacement options.

If you own a Genesis Coupe, you may encounter some common issues with your tail lights. One of the most common problems is faulty sockets, which can cause the tail lights to not work properly. Another issue you might face is blown fuses, which can result in the tail lights not functioning at all. Aside from these, there may be other possible problems such as wiring issues or damaged bulbs. It is important to address these issues promptly to ensure the safety and visibility of your vehicle on the road. If you are experiencing any of these problems, it is recommended to consult a professional mechanic or automotive specialist who can diagnose and repair the tail lights efficiently.
Tail Lights Genesis Coupe

Credit: www.reddit.com

Frequently Asked Questions On Tail Lights Genesis Coupe

Can You Replace Tail Light Bulbs With Leds?

Yes, you can replace tail light bulbs with LEDs. It’s a simple DIY task that any DIY enthusiast can do with minimal effort using a screwdriver. LED bulbs are state-of-the-art and offer a more efficient and durable alternative to traditional incandescent bulbs.

How Much Does A Tail Light Cost?

Tail light costs can vary depending on the make and model of your vehicle. Prices range from $150 to $610 for a set of tail lights. You can find tail lights on websites such as Amazon. com, eBay, and TopGearAutosport.

com. Replacing tail light bulbs with LEDs is a simple task that can be done by anyone with basic DIY skills.

Can I Replace A Tail Light?

Yes, you can easily replace a tail light. Simply access the rear light unit from inside the trunk and follow a step-by-step guide for the specific make and model of your vehicle. Most tail light bulbs are filled with halogen gas and can be readily replaced.

Conclusion

Upgrade your Hyundai Genesis Coupe with top-notch tail lights to enhance its appearance and visibility. With a wide range of options available, such as LED bar replacement taillights, you can find the perfect fit for your vehicle. Replacing your tail light bulbs with state-of-the-art LEDs is a simple DIY project that can be done with minimal effort.

Don’t let broken or outdated tail lights hold you back – choose from reputable sellers and enjoy the benefits of improved safety and style.