Recent Posts

How to Reset Oil Maintenance Light on 2012 Toyota Highlander


To reset the oil maintenance light on a 2012 Toyota Highlander, turn the vehicle to the “off” position, then press and hold the “Trip/Odometer” button while turning the ignition key to the “on” position. Release the button when the light resets.

If you own a 2012 Toyota Highlander, it’s essential to stay on top of your vehicle’s maintenance, including resetting the oil maintenance light when necessary. The oil maintenance light is a crucial indicator for keeping your Highlander in top condition, ensuring the engine runs smoothly and efficiently.

By following some simple steps, you can easily reset the oil maintenance light on your 2012 Toyota Highlander, allowing you to maintain your vehicle’s peak performance. In this guide, we’ll walk you through the simple process to reset the oil maintenance light and keep your Highlander running smoothly.

How to Reset Oil Maintenance Light on 2012 Toyota Highlander

Credit: www.brentbrowntoyota.com

Step-by-step Guide To Resetting The Oil Maintenance Light

Learn how to easily reset the oil maintenance light on your 2012 Toyota Highlander with this simple step-by-step guide.

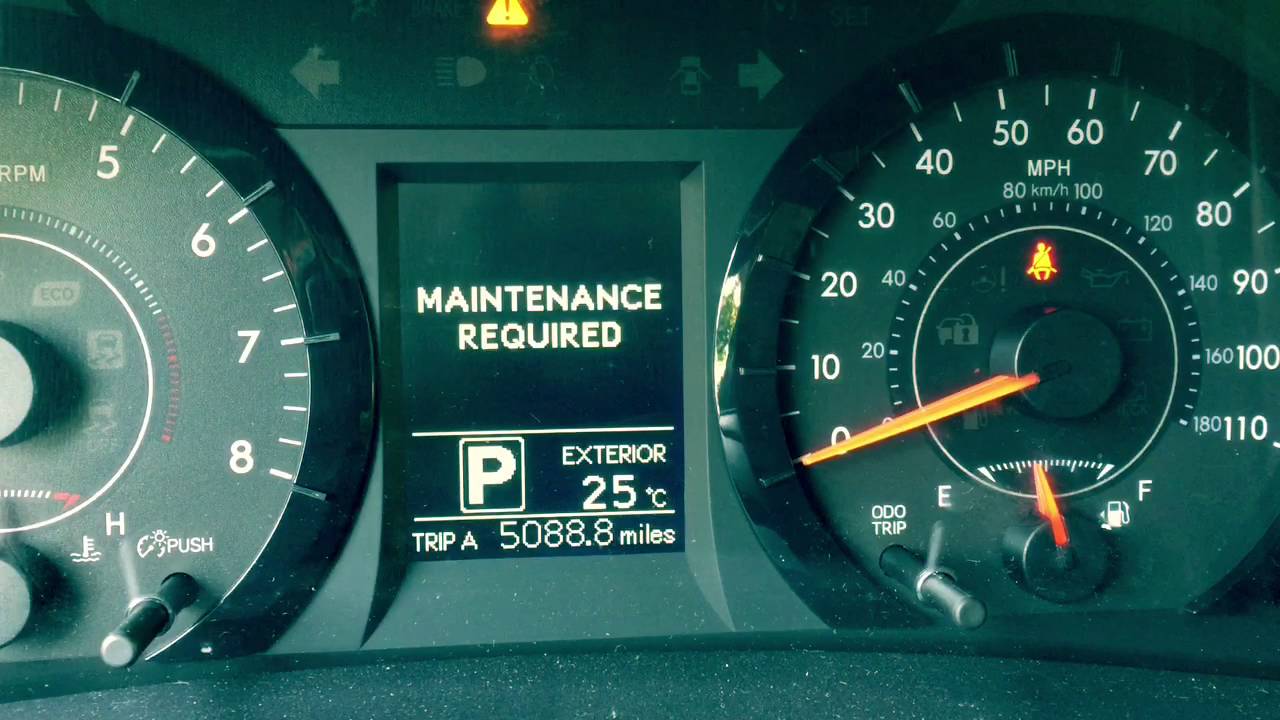
Checking The Maintenance Required Light

Make sure the maintenance required light is illuminated on your dashboard.

Turning On The Ignition

Insert the key and turn the ignition to the ‘On’ position without starting the engine.

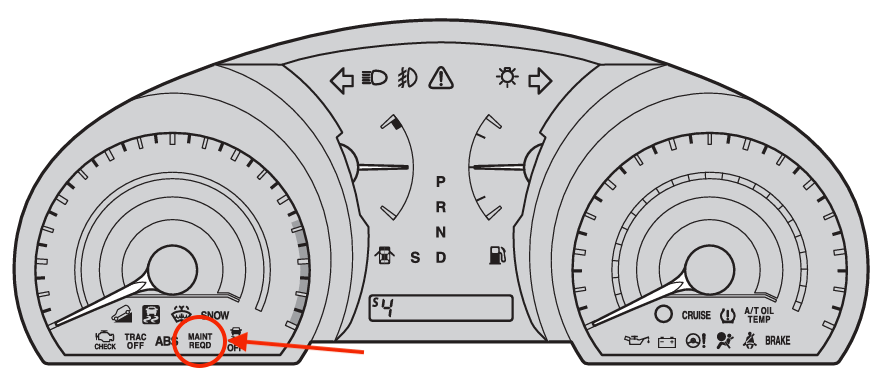
Holding The Odometer Button

Locate the odometer button and hold it down until the odometer reading is displayed.

Resetting The Light

Press and hold the odometer button while turning the ignition key to the ‘Off’ position.

Turn the ignition back to the ‘On’ position while still holding the odometer button.

Continue holding the button until the maintenance light resets and turns off.

How to Reset Oil Maintenance Light on 2012 Toyota Highlander

Credit: www.youtube.com

How to Reset Oil Maintenance Light on 2012 Toyota Highlander

Credit: oilreset.com

Frequently Asked Questions For How To Reset Oil Maintenance Light On 2012 Toyota Highlander

How Do I Reset The Oil Maintenance Light On My 2012 Toyota Highlander?

To reset the oil maintenance light on your 2012 Toyota Highlander, follow these simple steps:
1. Turn the ignition switch to the “On” position without starting the engine. 2. Locate and press the “Trip” button until the ODO (odometer) display appears. 3. Turn the ignition off. 4. Press and hold the “Trip” button while turning the ignition back to the “On” position. 5. Continue to hold the “Trip” button until the ODO display changes to show all zeros. 6. Release the “Trip” button and turn the ignition off. 7. Your oil maintenance light should now be reset.

How Often Does The Oil Maintenance Light Come On In A 2012 Toyota Highlander?

The oil maintenance light in a 2012 Toyota Highlander is designed to come on to remind you to change your oil at regular intervals. Generally, it comes on every 5,000 miles or every 6 months, whichever comes first. It’s important to follow the recommended maintenance schedule in your vehicle’s manual to ensure optimal performance and longevity of your engine.

Can I Reset The Oil Maintenance Light Without Changing The Oil?

While it is possible to reset the oil maintenance light without changing the oil, it is not recommended. The oil maintenance light serves as a reminder to change the oil and filter in your vehicle, as regular oil changes are essential for proper engine function and longevity.

Ignoring the maintenance light and not changing the oil can lead to decreased performance, increased fuel consumption, and even engine damage. It’s best to follow your vehicle’s recommended maintenance schedule and change the oil when indicated by the light.

Conclusion

Keeping your Toyota Highlander in top condition is crucial for its longevity. By following these simple steps, you can easily reset the oil maintenance light on your 2012 model. Regular maintenance is key to ensuring your vehicle runs smoothly and efficiently.

Stay proactive and enjoy a well-maintained vehicle for years to come.


How to Reset Maintenance Light on Toyota Sienna 2017


To reset the maintenance light on a 2017 Toyota Sienna, first, turn the ignition to the “On” position, but do not start the engine. Press the “Trip” button to display the trip meter A or B, then turn the ignition off.

While holding down the trip reset button, turn the ignition back to the “On” position. Continue holding the trip reset button until the maintenance light resets. Finally, turn the ignition off and back on to confirm that the maintenance light has been reset.

Owning a 2017 Toyota Sienna means staying on top of maintenance, including resetting the maintenance light after completing a service. Following the simple steps outlined can help you reset the maintenance light on your Sienna, ensuring that you have a clear reminder for when your next service is due. This will also save you time and money, as you won’t have to visit a dealership or mechanic for this simple task. Understanding your car’s maintenance indicators is essential for keeping your vehicle in top condition.

Step-by-step Guide To Resetting The Maintenance Light

Learn how to easily reset the maintenance light on your Toyota Sienna 2017 with this step-by-step guide. Quickly clear the light without the need for a trip to the dealership. Effortlessly keep your vehicle in optimal condition with these simple instructions.

Step-by-Step Guide to Resetting the Maintenance Light

Resetting the maintenance light on your Toyota Sienna 2017 is a simple process that can be done in just a few steps. Follow the guide below to clear the maintenance light on your vehicle and ensure it stays in top condition.

Checking the Ignition Status

1. Before starting, make sure the ignition is turned off to begin the reset process.
2. Locate the trip odometer button on the instrument cluster of your Toyota Sienna.

Pressing and Holding the Trip Odometer

1. Press and hold the trip odometer button while turning the ignition key to the ‘ON’ position.
2. Continue holding the trip odometer button until the maintenance light starts flashing, indicating that the reset process has begun.

Turning the Ignition to the ‘ON’ Position

1. Once the maintenance light starts flashing, turn the ignition key back to the ‘OFF’ position briefly.
2. Turn the ignition key again to the ‘ON’ position while still holding the trip odometer button.

Releasing the Trip Odometer Button

1. Release the trip odometer button when the maintenance light stops flashing.
2. The maintenance light should now be reset, indicating that the procedure was successful.

Confirming the Reset

1. Start the engine of your Toyota Sienna to confirm that the maintenance light has been reset.
2. Ensure the light does not appear again, indicating that the reset was done correctly.

By following these simple steps, you can quickly reset the maintenance light on your Toyota Sienna 2017 and keep track of your vehicle’s service schedule.

How to Reset Maintenance Light on Toyota Sienna 2017

Credit: www.youtube.com

Potential Issues And Troubleshooting

When it comes to resetting the maintenance light on a Toyota Sienna 2017, you may encounter a few potential issues that could prevent the successful reset of the light. Here are some troubleshooting tips to help you resolve these issues:

Maintenance Light Keeps Coming On

If the maintenance light in your Toyota Sienna 2017 keeps coming on after resetting, it could indicate that there is an unresolved issue with the vehicle that needs attention. It is advisable to check for any underlying problems such as low oil levels, worn-out spark plugs, or a faulty oxygen sensor. Addressing these issues promptly can help prevent the recurrence of the maintenance light.

Maintenance Light Does Not Reset

If the maintenance light does not reset after following the correct procedure, there could be a few reasons behind this issue. First, ensure that you are following the correct steps as outlined in the vehicle’s manual. Additionally, check the oil level and quality to ensure it meets the manufacturer’s specifications. If the light still does not reset, it may be necessary to seek assistance from a qualified mechanic to diagnose any potential system malfunctions that could be preventing the reset.

Tips For Proper Vehicle Maintenance


Regular maintenance of your vehicle is essential to ensure its longevity and optimal performance. By following these tips for proper vehicle maintenance, you can keep your Toyota Sienna 2017 in top condition and minimize the need for costly repairs and replacements in the future.

Regularly Scheduled Maintenance

Regularly scheduled maintenance ensures that your Toyota Sienna 2017 operates at its best. Stick to the maintenance schedule outlined in your owner’s manual, which includes oil and filter changes, air filter replacement, and inspections of various components such as brakes, suspension, and steering system.

Checking Fluid Levels

Regularly checking your vehicle’s fluid levels is crucial for proper maintenance. Ensure that the engine oil, coolant, brake fluid, and transmission fluid are at the recommended levels. Low fluid levels can lead to engine damage and other mechanical issues.

Tire Maintenance

Maintaining proper tire pressure and tread depth is vital for safety and performance. Check the tire pressure regularly and ensure it matches the recommended levels specified in the owner’s manual. Additionally, inspect the tires for signs of wear and tear and replace them when necessary.

Replacing Worn-out Parts

Worn-out parts such as brake pads, spark plugs, and timing belts should be replaced according to the manufacturer’s recommendations. Ignoring worn-out parts can lead to decreased performance and potential safety hazards.

Keeping Track Of Service Records

Keeping track of your vehicle’s service records is essential for maintaining its value and ensuring that all necessary maintenance tasks are completed on time. Maintain a record of all the services and repairs performed, including the date, mileage, and details of the work carried out.


Frequently Asked Questions Of How To Reset Maintenance Light On Toyota Sienna 2017

How Do I Reset The Maintenance Light On My Toyota Sienna 2017?

To reset the maintenance light on your Toyota Sienna 2017, follow these simple steps:
1. Turn on the ignition without starting the engine. 2. Press and hold the trip meter reset button. 3. While holding the button, turn the ignition off and then back on. 4. Continue holding the button until the maintenance light flashes and then goes off. 5. Release the button and you’re done! Your maintenance light is now reset.

Why Is The Maintenance Light On In My Toyota Sienna 2017?

The maintenance light in your Toyota Sienna 2017 indicates that it’s time for regular vehicle maintenance. It’s a reminder to have your car serviced and important inspections performed to keep it running smoothly and avoid potential issues.

How Often Should I Reset The Maintenance Light On My Toyota Sienna 2017?

You should reset the maintenance light on your Toyota Sienna 2017 each time you have completed the recommended maintenance tasks specified in your vehicle’s owner’s manual. This ensures that the light accurately reflects when your next service is due.

Conclusion

Keep up with regular maintenance to ensure your Toyota Sienna 2017 runs smoothly. Resetting the maintenance light is a simple task that you can easily do at home. Following the steps outlined in this guide will help you keep your vehicle in top condition without any hassle.

Remember, proper maintenance leads to longevity.

How to Charge 2014 Toyota Prius Hybrid Battery


The 2014 Toyota Prius is a popular hybrid vehicle known for its energy efficiency and low emissions. One of the most vital components of the Prius is its hybrid battery, which powers the electric motor alongside the internal combustion engine. In this article, we will explore the various methods for charging the hybrid battery of a 2014 Toyota Prius.

Charging the Battery

There are two primary methods for charging the battery of a 2014 Toyota Prius: through regenerative braking and via an external power source. Regenerative braking allows the vehicle’s kinetic energy to be converted into electrical energy and stored in the battery. However, for a more substantial charge, connecting the Prius to an external power supply is necessary.

External Charging

To charge the 2014 Toyota Prius using an external power source, you will need to use a charging cable specifically designed for hybrid vehicles. Most Prius models come equipped with a standard charging cable that can be plugged into a typical household outlet. Alternatively, there are also specialized charging stations that can provide a faster and more efficient charge.

When connecting the charging cable to the Prius:

  • Ensure that the vehicle is switched off and in park
  • Locate the charging port, typically located at the front of the vehicle
  • Plug the charging cable securely into the port
  • Once connected, the Prius will indicate that it is charging

Charging Time

The time required to fully charge the 2014 Toyota Prius hybrid battery depends on several factors, including the capacity of the battery, the level of depletion, and the charging source. Using a standard household outlet, a full charge typically takes around 8-12 hours. However, with a specialized charging station, this time can be reduced significantly to approximately 2-4 hours.

Regenerative Braking

The 2014 Toyota Prius utilizes regenerative braking to capture and convert the kinetic energy produced during braking into electrical energy. This energy is then used to recharge the hybrid battery. The process is entirely automated, requiring no input from the driver, and is a key characteristic of the Prius’s energy-efficient design.

 
How to Charge 2014 Toyota Prius Hybrid Battery

Importance of Charging

Ensuring that the hybrid battery of the 2014 Toyota Prius is adequately charged is essential for maximizing fuel efficiency and vehicle performance.

A well-maintained battery allows the vehicle to operate in electric mode for more extended periods, reducing the overall consumption of gasoline and minimizing emissions. Regular charging also contributes to the longevity of the battery and helps preserve its storage capacity.

 
How to Charge 2014 Toyota Prius Hybrid Battery

FAQ

How Often Should I Charge The 2014 Toyota Prius Hybrid Battery?

To optimize battery life, it is recommended to charge the 2014 Toyota Prius Hybrid battery at least once every few weeks or whenever the charge level drops below 50%.

Can I Charge The Toyota Prius Hybrid Battery Using A Regular Electric Outlet?

Yes, you can charge the 2014 Toyota Prius Hybrid battery using a regular 120V electric outlet. However, it will take longer to charge compared to using a dedicated charging station.

Is It Necessary To Fully Charge The Toyota Prius Hybrid Battery Every Time?

No, it is not necessary to fully charge the 2014 Toyota Prius Hybrid battery every time. Charging it to around 80% will still provide sufficient power for regular usage while helping to prolong the battery’s lifespan.


How to Turn off RCTA on Toyota


Turning off the RCTA (Rear Cross Traffic Alert) system in your Toyota can be useful in certain situations, such as when towing a trailer or when the system is providing too many alerts in a congested parking lot. This guide will provide you with the necessary steps to turn off the RCTA feature in your Toyota vehicle.

Step 1: Locate the Settings Menu

First, ensure that your vehicle is in park and the ignition is turned on. Then, locate the settings menu on your vehicle’s infotainment screen. This is typically accessed through the touchscreen display or using the physical buttons on the center console.

Step 2: Access the Vehicle Settings

Once you have accessed the settings menu, navigate to the “Vehicle Settings” or “Driver Assistance Settings” option. This is where you can find the specific settings related to the RCTA feature and other driver assistance systems in your Toyota.

Step 3: Disable RCTA

Within the vehicle settings, look for an option related to the RCTA system. It may be listed as “RCTA,” “Rear Cross Traffic Alert,” or something similar. Select this option to access the RCTA settings.

Step 4: Turn off the RCTA System

Once you have accessed the RCTA settings, you should see an option to enable or disable the system. Select the disable option to turn off the RCTA feature in your Toyota. Some vehicles may require you to confirm this action to complete the process.

How to Turn off Rcta on Toyota

Step 5: Verify the Status

After disabling the RCTA system, it’s important to verify that the feature has been turned off. You can do this by looking for a visual indicator on the infotainment screen or checking the vehicle’s owner’s manual for any specific indicators related to the RCTA system status.

Step 6: Re-Enable if Needed

If there comes a time when you want to turn the RCTA system back on, simply follow the same steps outlined above, but select the enable option in the RCTA settings menu.

How to Turn off Rcta on Toyota

Important Considerations

Keep in mind that disabling the RCTA system may affect the overall safety and awareness while driving, especially when backing out of parking spaces or driveways. It’s essential to be fully aware of your surroundings and use caution when the RCTA feature is turned off.

Additionally, it’s recommended to familiarize yourself with the specific steps and settings for your particular Toyota model, as the menu options and layout can vary between different vehicles and model years.

FAQ

How Do I Turn Off Rcta On Toyota?

To turn off RCTA on your Toyota vehicle, go to the settings menu on the infotainment screen. Look for the “RCTA” or “Rear Cross Traffic Alert” option and select “Off”.

Can I Disable The Rcta Feature Temporarily?

Yes, you can temporarily disable the RCTA feature on your Toyota. Simply press the RCTA button, usually located on the dashboard or near the side mirrors, to turn off the system. Remember to turn it back on when needed for safer driving.

Is It Possible To Permanently Disable Rcta On My Toyota?

While you cannot permanently disable the RCTA feature, you can customize its behavior to suit your preferences. In the settings menu, you can adjust the sensitivity or volume of the alerts, making the system less intrusive without completely turning it off.

Conclusion

By following these step-by-step instructions, you should be able to successfully turn off the RCTA system in your Toyota vehicle when needed. Remember to prioritize safety and awareness while driving, and consider re-enabling the RCTA feature when it’s appropriate for your driving situation.


How Long is a Toyota Highlander


How Long is a Toyota Highlander

The Toyota Highlander is a popular SUV known for its spaciousness, versatility, and reliability. If you’re considering purchasing a Toyota Highlander, one of the important factors you might consider is its size. In this article, we will explore the dimensions of the Toyota Highlander and answer the question, “How long is a Toyota Highlander?”

Toyota Highlander Length

The length of a Toyota Highlander can vary depending on the specific model and year. The 2021 Toyota Highlander, for example, has a length of 194.9 inches.

Toyota Highlander Dimensions

Here are the dimensions of the different Toyota Highlander trim levels:

Trim Level Length (inches)
LE 194.9
XLE 194.9
XSE 194.9
Limited 194.9

As you can see, all the trim levels of the Toyota Highlander have the same length of 194.9 inches.


Toyota Highlander Hybrid

If you’re interested in the Toyota Highlander Hybrid, you might be wondering if its dimensions are different from the regular Toyota Highlander. In terms of length, the Toyota Highlander Hybrid has the same dimensions as the regular Toyota Highlander, at 194.9 inches.

Toyota Highlander Width and Height

While the length is an important dimension to consider, it’s also worth knowing the width and height of the Toyota Highlander. The width of the Toyota Highlander is approximately 76.0 inches, and the height varies depending on the model and trim level. However, on average, the Toyota Highlander has a height of around 70.0 inches.

How Long is a Toyota Highlander

Credit: www.automobiledimension.com

How Long is a Toyota Highlander

Credit: www.caranddriver.com

Frequently Asked Questions Of How Long Is A Toyota Highlander

How Long Is A Toyota Highlander From Bumper To Bumper?

The Toyota Highlander measures approximately 194. 9 inches from bumper to bumper.

How Many Inches Long Is The Toyota Highlander?

The Toyota Highlander is approximately 194. 9 inches long.

How Big Is A Toyota Highlander In Feet?

The Toyota Highlander is approximately 16. 3 feet long.

Conclusion

So, to answer the question, “How long is a Toyota Highlander?” the length of a Toyota Highlander is 194.9 inches. It’s important to note that these dimensions may vary slightly depending on the specific trim level and year.

Whether you’re planning a family road trip or simply need a spacious and reliable vehicle for everyday use, the Toyota Highlander is a great choice. Its generous dimensions allow for ample cargo space and comfortable seating for up to eight passengers.

With its impressive length, the Toyota Highlander offers a perfect blend of style, functionality, and performance. If you’re considering purchasing a Toyota Highlander, be sure to check out the specific dimensions of the trim level and year you’re interested in for the most accurate measurements.

How to Charge Toyota Prius Hybrid Battery


If you own a Toyota Prius, you may be wondering how to effectively charge its hybrid battery. The Toyota Prius is a popular hybrid vehicle known for its impressive fuel efficiency, and understanding how to charge its battery can help you get the most out of your vehicle. In this article, we’ll explore different methods for charging the Toyota Prius hybrid battery, as well as some tips for maximizing its performance and longevity.

How to Charge Toyota Prius Hybrid Battery

Credit: hybridautomotive.com

Charging Options for Toyota Prius Hybrid Battery

When it comes to charging the Toyota Prius hybrid battery, there are a few different options to consider. The Prius is equipped with a regenerative braking system that helps to charge the battery while driving, but there are additional methods that can be used to ensure the battery remains fully charged.

1. Driving Habits For Battery Charging

One of the most effective ways to charge the Toyota Prius hybrid battery is by optimizing your driving habits. The regenerative braking system captures energy that would otherwise be lost during braking and converts it into electrical energy to recharge the battery. By adopting smooth and efficient driving habits, you can maximize the effectiveness of the regenerative braking system and help keep the battery charged.

2. Using The Ev Mode

The Toyota Prius also includes an EV (Electric Vehicle) mode that allows the vehicle to operate solely on electric power for short distances. Engaging the EV mode can help conserve the battery’s charge and reduce the need for frequent charging. However, it’s important to note that the EV mode is best suited for low-speed driving and may not be ideal for all situations.

3. Using A Plug-in Charger

For situations where it may be necessary to manually charge the Toyota Prius hybrid battery, a plug-in charger can be used. There are several types of chargers available, including Level 1 and Level 2 chargers. Level 1 chargers can be plugged into a standard household outlet, while Level 2 chargers require a dedicated charging station.

When using a plug-in charger, it’s important to follow the manufacturer’s recommendations and guidelines for charging the Prius battery. This includes ensuring that the charger is compatible with the vehicle and using the appropriate charging settings to prevent overcharging or damage to the battery.

How to Charge Toyota Prius Hybrid Battery

Credit: bumblebeebatteries.com

Tips for Maximizing Prius Hybrid Battery Performance

In addition to understanding how to charge the Toyota Prius hybrid battery, there are several tips for maximizing its performance and longevity.

1. Regular Maintenance

It’s important to stay on top of regular maintenance for the Prius hybrid battery to ensure optimal performance. This includes keeping the battery clean and free of debris, as well as following the manufacturer’s recommended maintenance schedule for inspections and servicing.

2. Efficient Driving Practices

Practicing efficient driving habits, such as gentle acceleration and braking, can help extend the lifespan of the Prius hybrid battery. By minimizing abrupt changes in speed and driving patterns, you can reduce unnecessary strain on the battery and improve its overall performance.

3. Temperature Considerations

Extreme temperatures can have a significant impact on the performance and longevity of the hybrid battery. It’s important to be mindful of temperature considerations and take steps to protect the battery from extreme heat or cold. Parking in shaded areas and using thermal insulating materials can help mitigate the effects of temperature on the battery.

4. Scheduled Charging

When using a plug-in charger, it’s recommended to schedule charging during off-peak hours to take advantage of lower electricity rates. This not only helps save on charging costs, but it also reduces the load on the electrical grid during peak demand periods.

5. Avoiding Deep Discharges

Avoiding deep discharges of the hybrid battery can help preserve its overall lifespan. It’s recommended to maintain a reasonable charge level in the battery whenever possible to prevent excessive depletion of its capacity.


Frequently Asked Questions For How To Charge Toyota Prius Hybrid Battery

How Often Should I Charge The Toyota Prius Hybrid Battery?

To maintain optimal battery performance, it is recommended to charge your Toyota Prius Hybrid Battery at least once every two to three weeks, especially if the vehicle is not driven regularly. Regular charging helps prevent the battery from deep discharging and extends its overall lifespan.

Can I Charge My Toyota Prius Hybrid Battery At Home?

Yes, you can charge your Toyota Prius Hybrid Battery at home using a standard electrical outlet. The vehicle is equipped with a built-in charging system that allows you to conveniently plug it in and charge the battery. Make sure to use the provided charger and follow the manufacturer’s instructions for safe and efficient charging.

How Long Does It Take To Charge The Toyota Prius Hybrid Battery?

The time required to charge your Toyota Prius Hybrid Battery depends on several factors, including the battery’s current charge level and the charging method used. Generally, a full charge can take anywhere from 1 to 5 hours. It is recommended to monitor the charging process and disconnect the charger once the battery is fully charged to avoid overcharging.

Conclusion

Charging the Toyota Prius hybrid battery is an essential aspect of maximizing the vehicle’s performance and fuel efficiency. By understanding the various charging options available, as well as implementing best practices for battery maintenance and driving habits, you can ensure that your Prius battery remains in optimal condition for years to come. Whether utilizing the regenerative braking system, engaging the EV mode, or using a plug-in charger when necessary, taking a proactive approach to charging and battery care can help you get the most out of your Toyota Prius hybrid vehicle.